SCIM Integration for Users & Groups
Microsoft Entra ID (Previously Azure Active Directory) SCIM support can be used to provision and modify users and groups in Servicely automatically based on changes to the identity provider in Microsoft Entra ID.
The provisioning is one way from Entra ID into Servicely.
Configuration in Servicely
Servicely administrator role is required to perform all Servicely configuration outlined on this documentation.
Two records need to be configured in Servicely to support integration with Entra ID. A ScimConfiguration record and a SystemApiToken record.
ScimConfiguration
- Navigate to SCIM configurations page using the following navigation menu:

2. On the resulting page, click “New” to create a new configuration.
Please ensure the Scim configuration record is set to the below
to Active = Yes and Default = No
Field | Value |
|---|---|
Active | Yes |
Default | Yes |
If required, you may also create related Attribute mapping record using the ones related to the sample Scim configuration record (screenshot below), as examples. If you do create related Attribute mapping record(s), please ensure that they are active.

SystemApiToken
- Navigate to System API tokens page using the following navigation menu:

- On the resulting page, click “New” to create a new configuration. You can give it a name, e.g. “Entra ID SCIM”. Please then ensure that it is set to Active = Yes per the screenshot below.
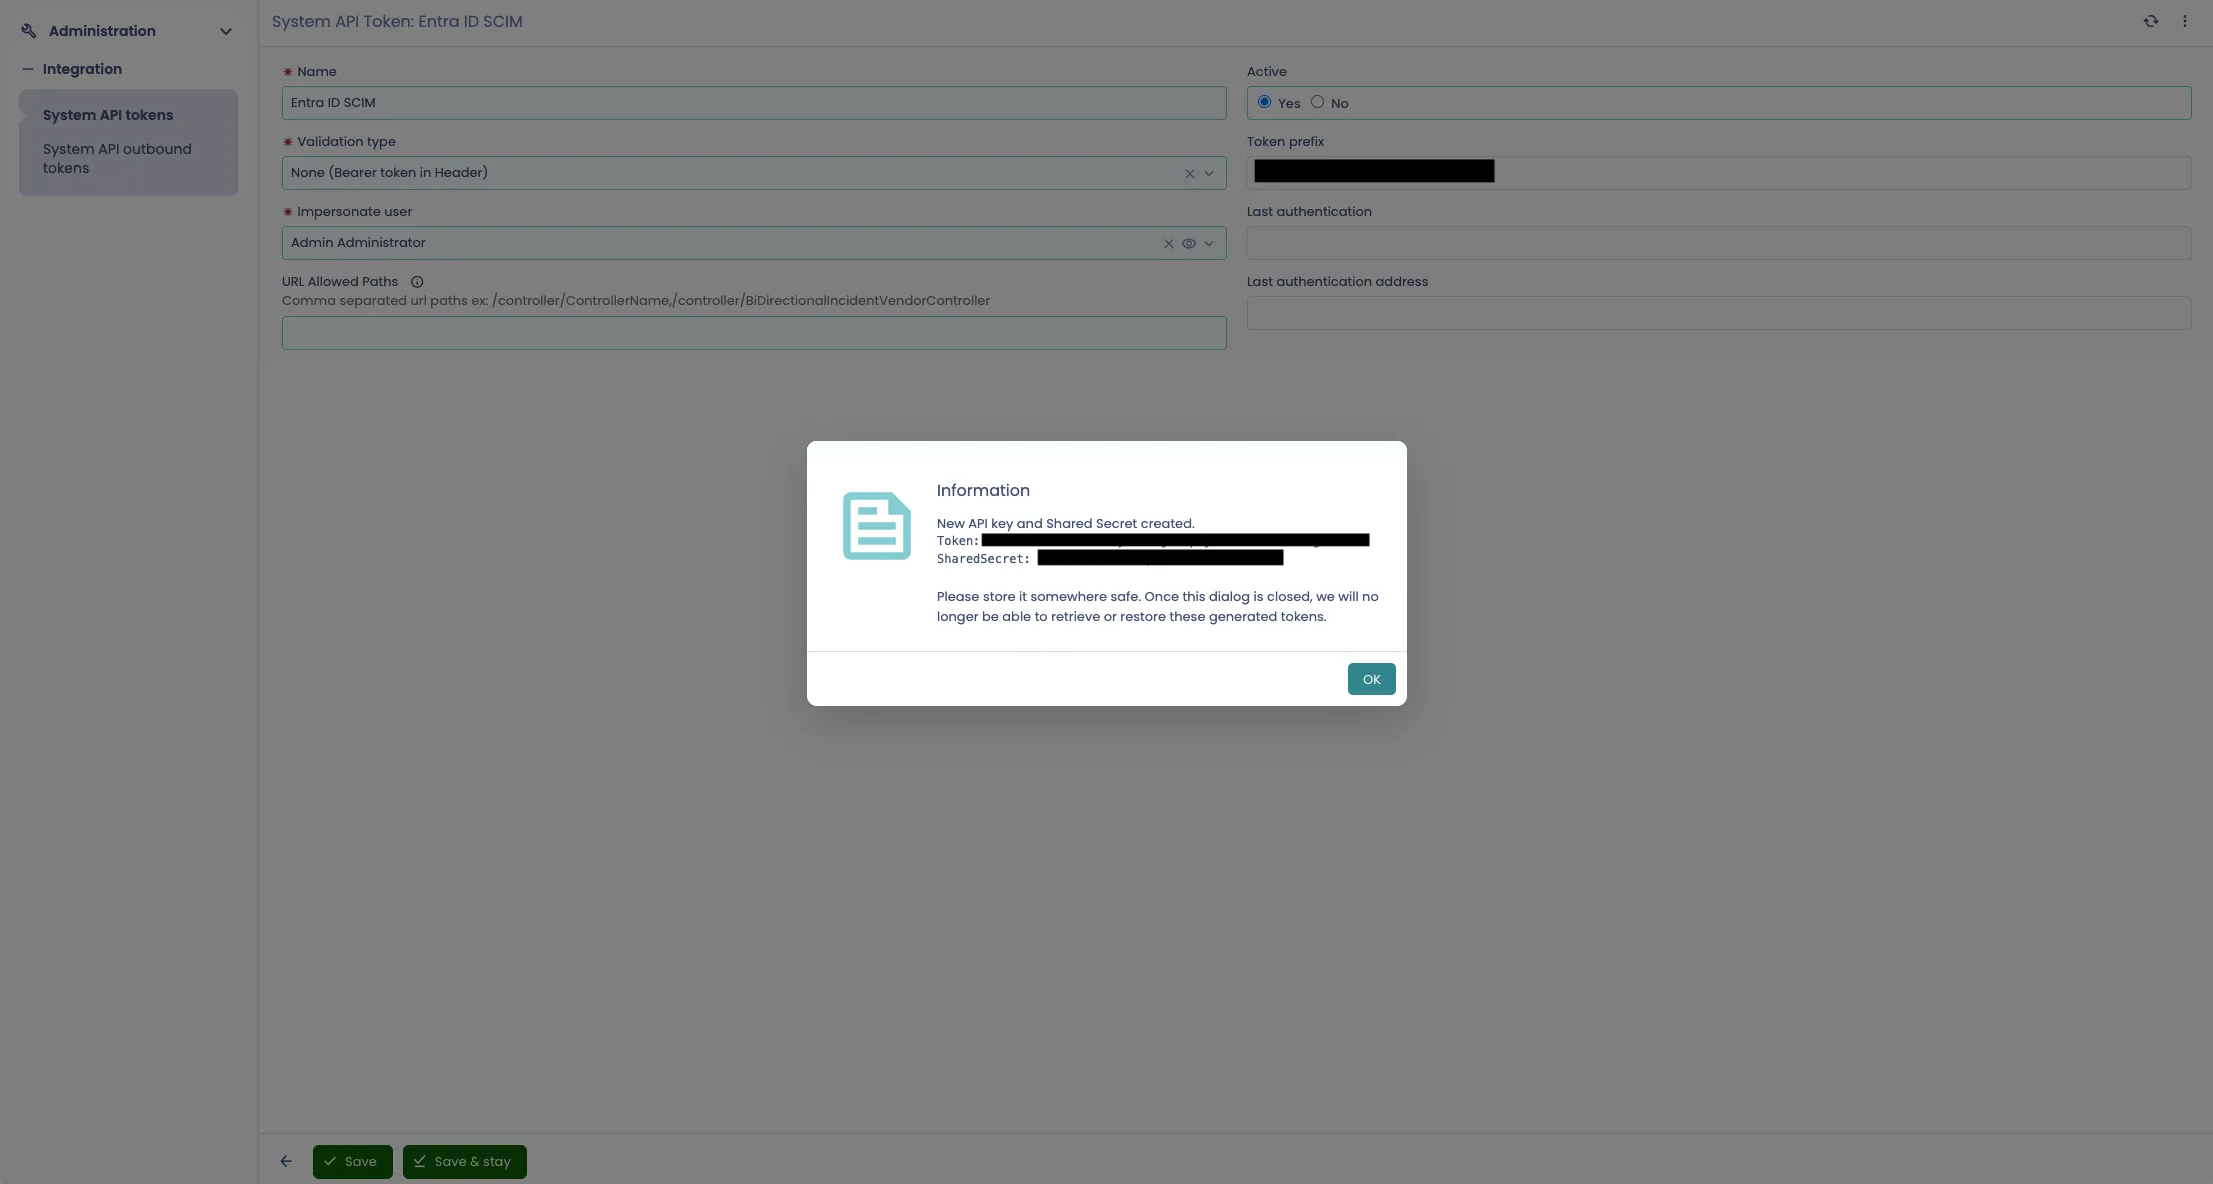
3. Then, a new Bearer token needs to be generated which will need to be copied and placed in the Entra ID SCIM configuration.
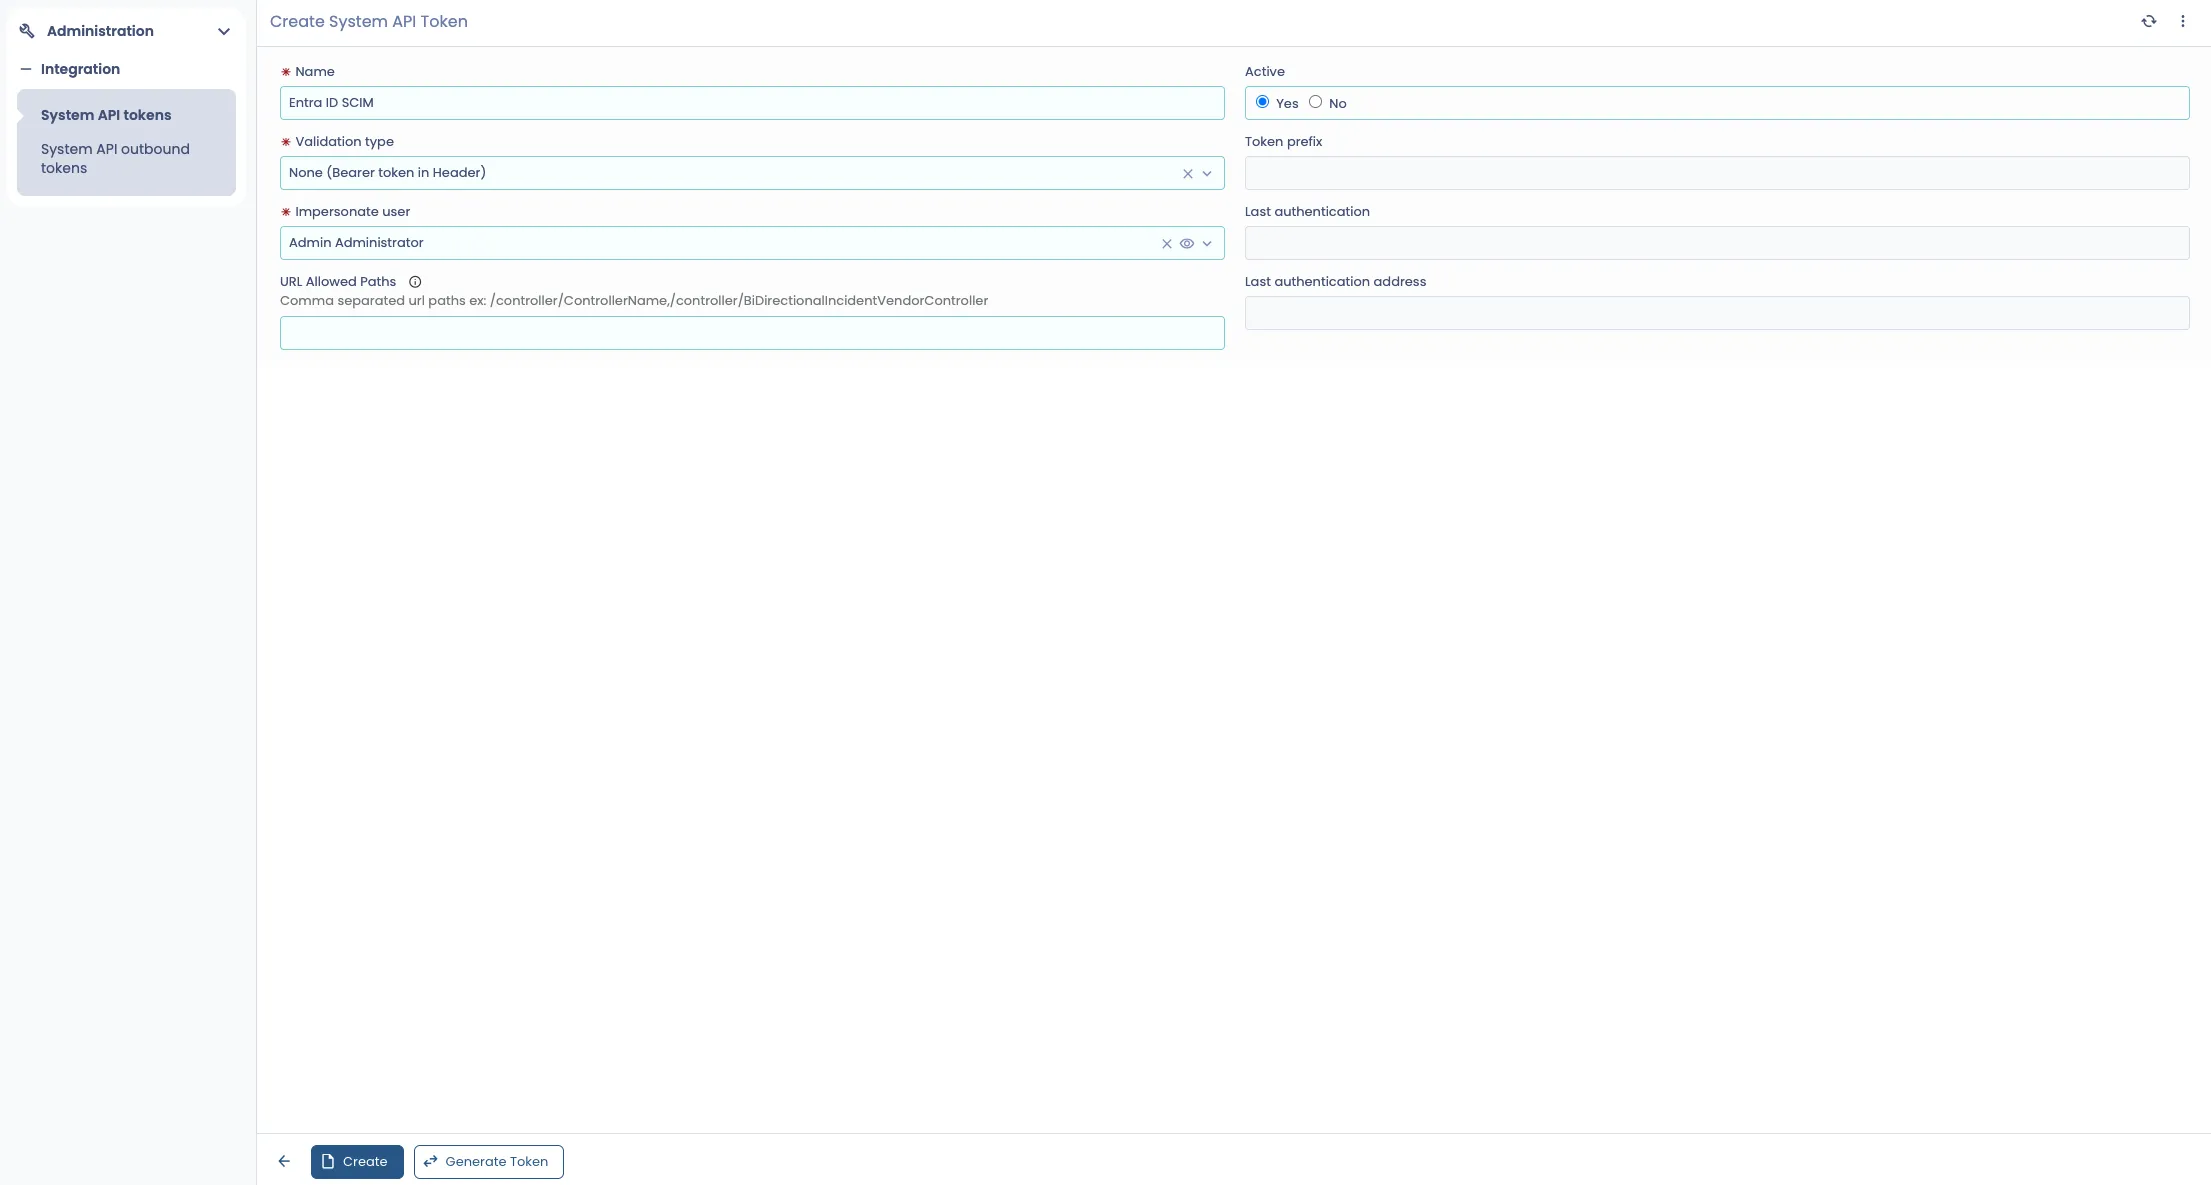
Click on Generate Token and copy the Token value, so that it can be entered in the Entra ID SCIM configuration in the later steps below.
Configuration in Microsoft Entra ID (Previously) Azure Active Directory
Choose / Set-up Entra ID Enterprise application
Sign into the Entra ID portal. If you have an Enterprise application that is used for SSO to the Servicely environment, you may use that. Otherwise, if you have to create a new Enterprise application, please do that:
- Go to list of Enterprise applications on Entra ID and click on “New application”

- On the following page, click on “Create your own application”

- Select “Integrate any other application you don’t find in the gallery (Non-gallery)” option on the resulting “Create your own application” pop-up.

Configuring Entra ID Enterprise application
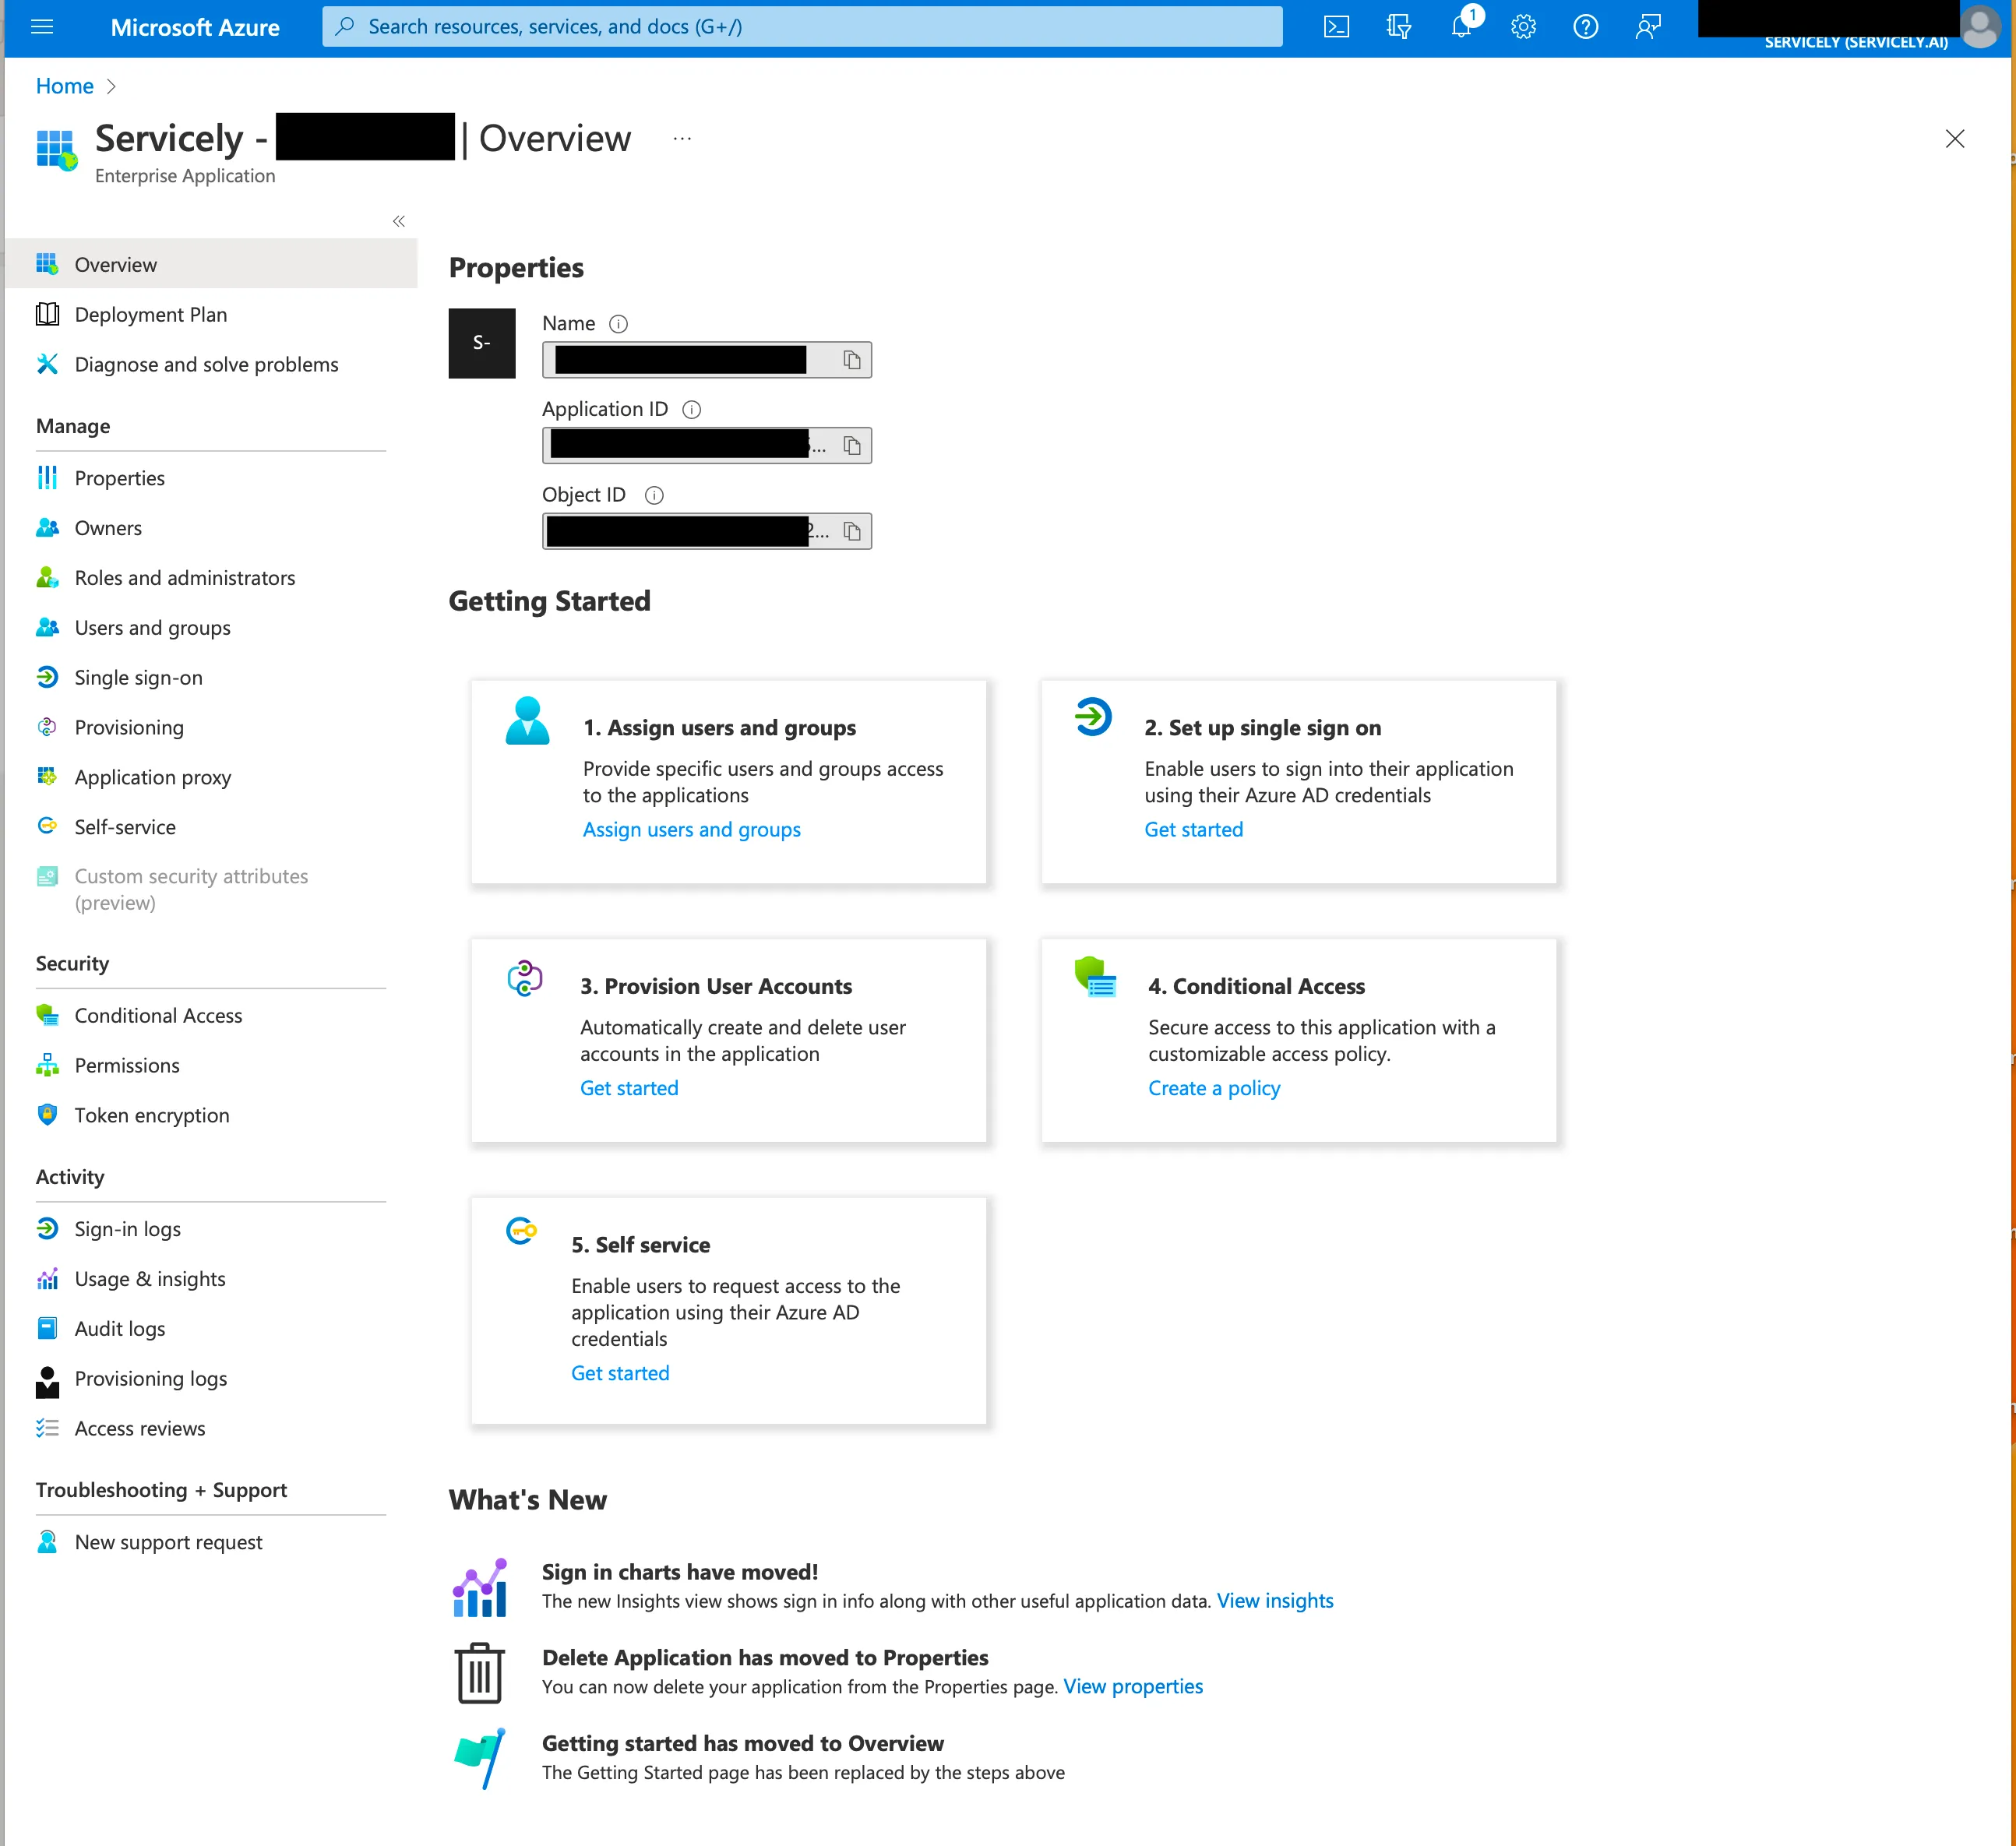
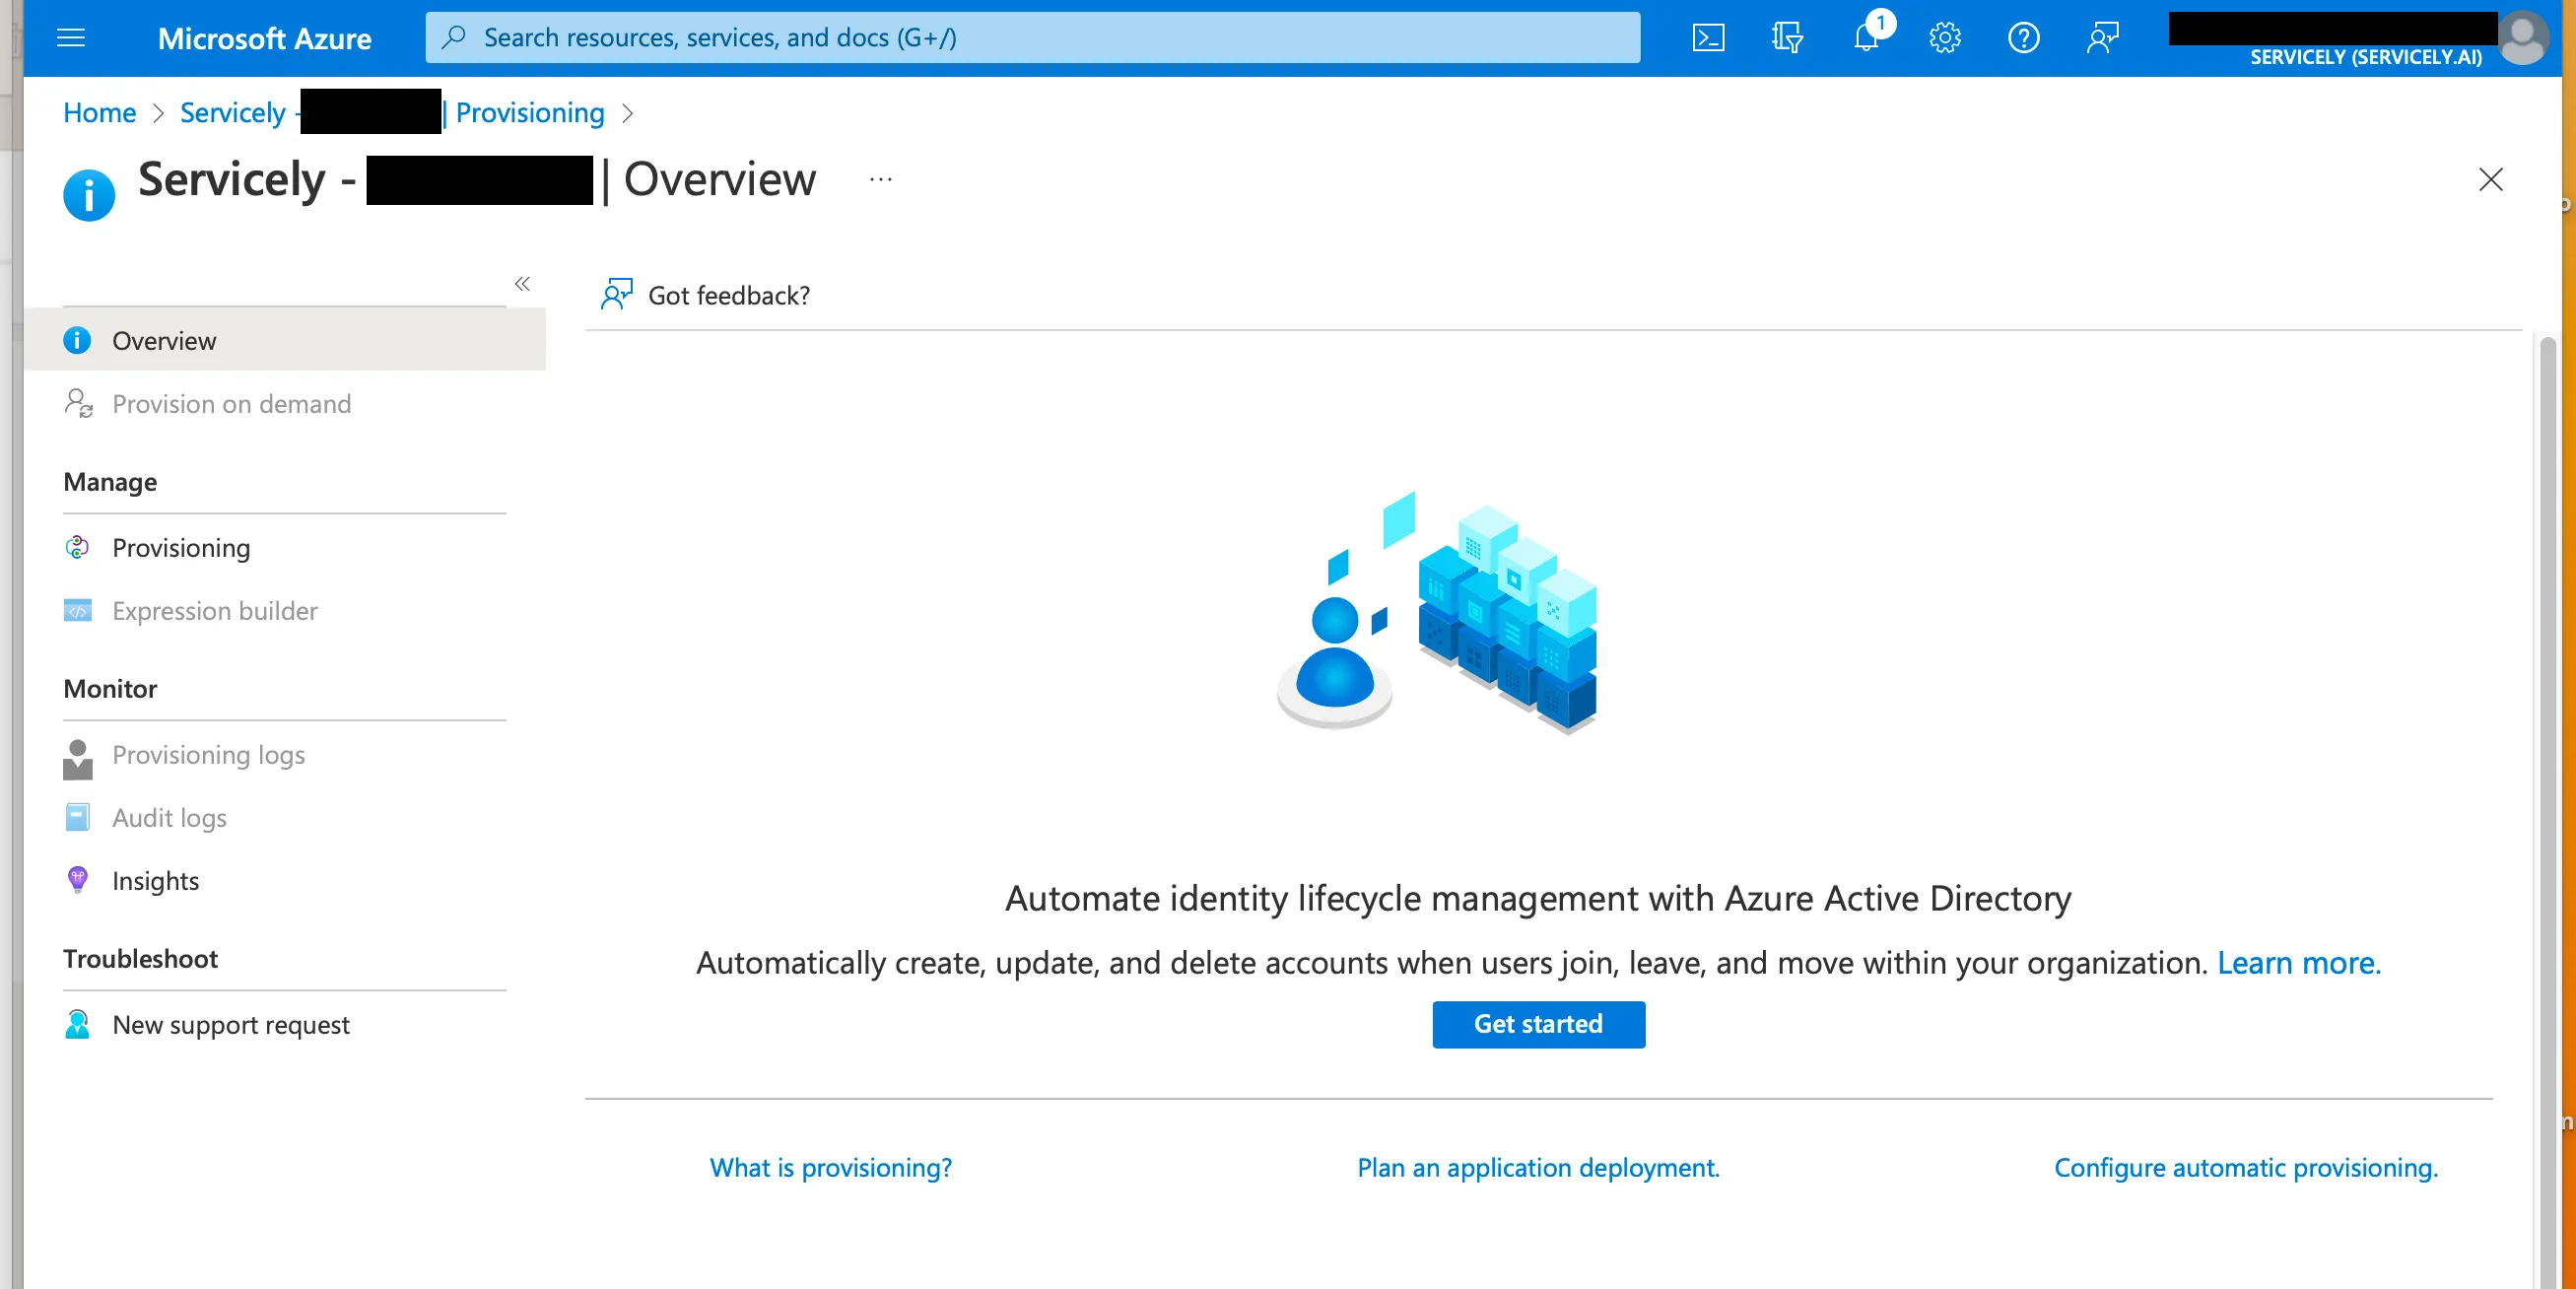
Select Provisioning from the left hand menu and click Get started if necessary.
Select Automatic from the Provisioning Mode menu.
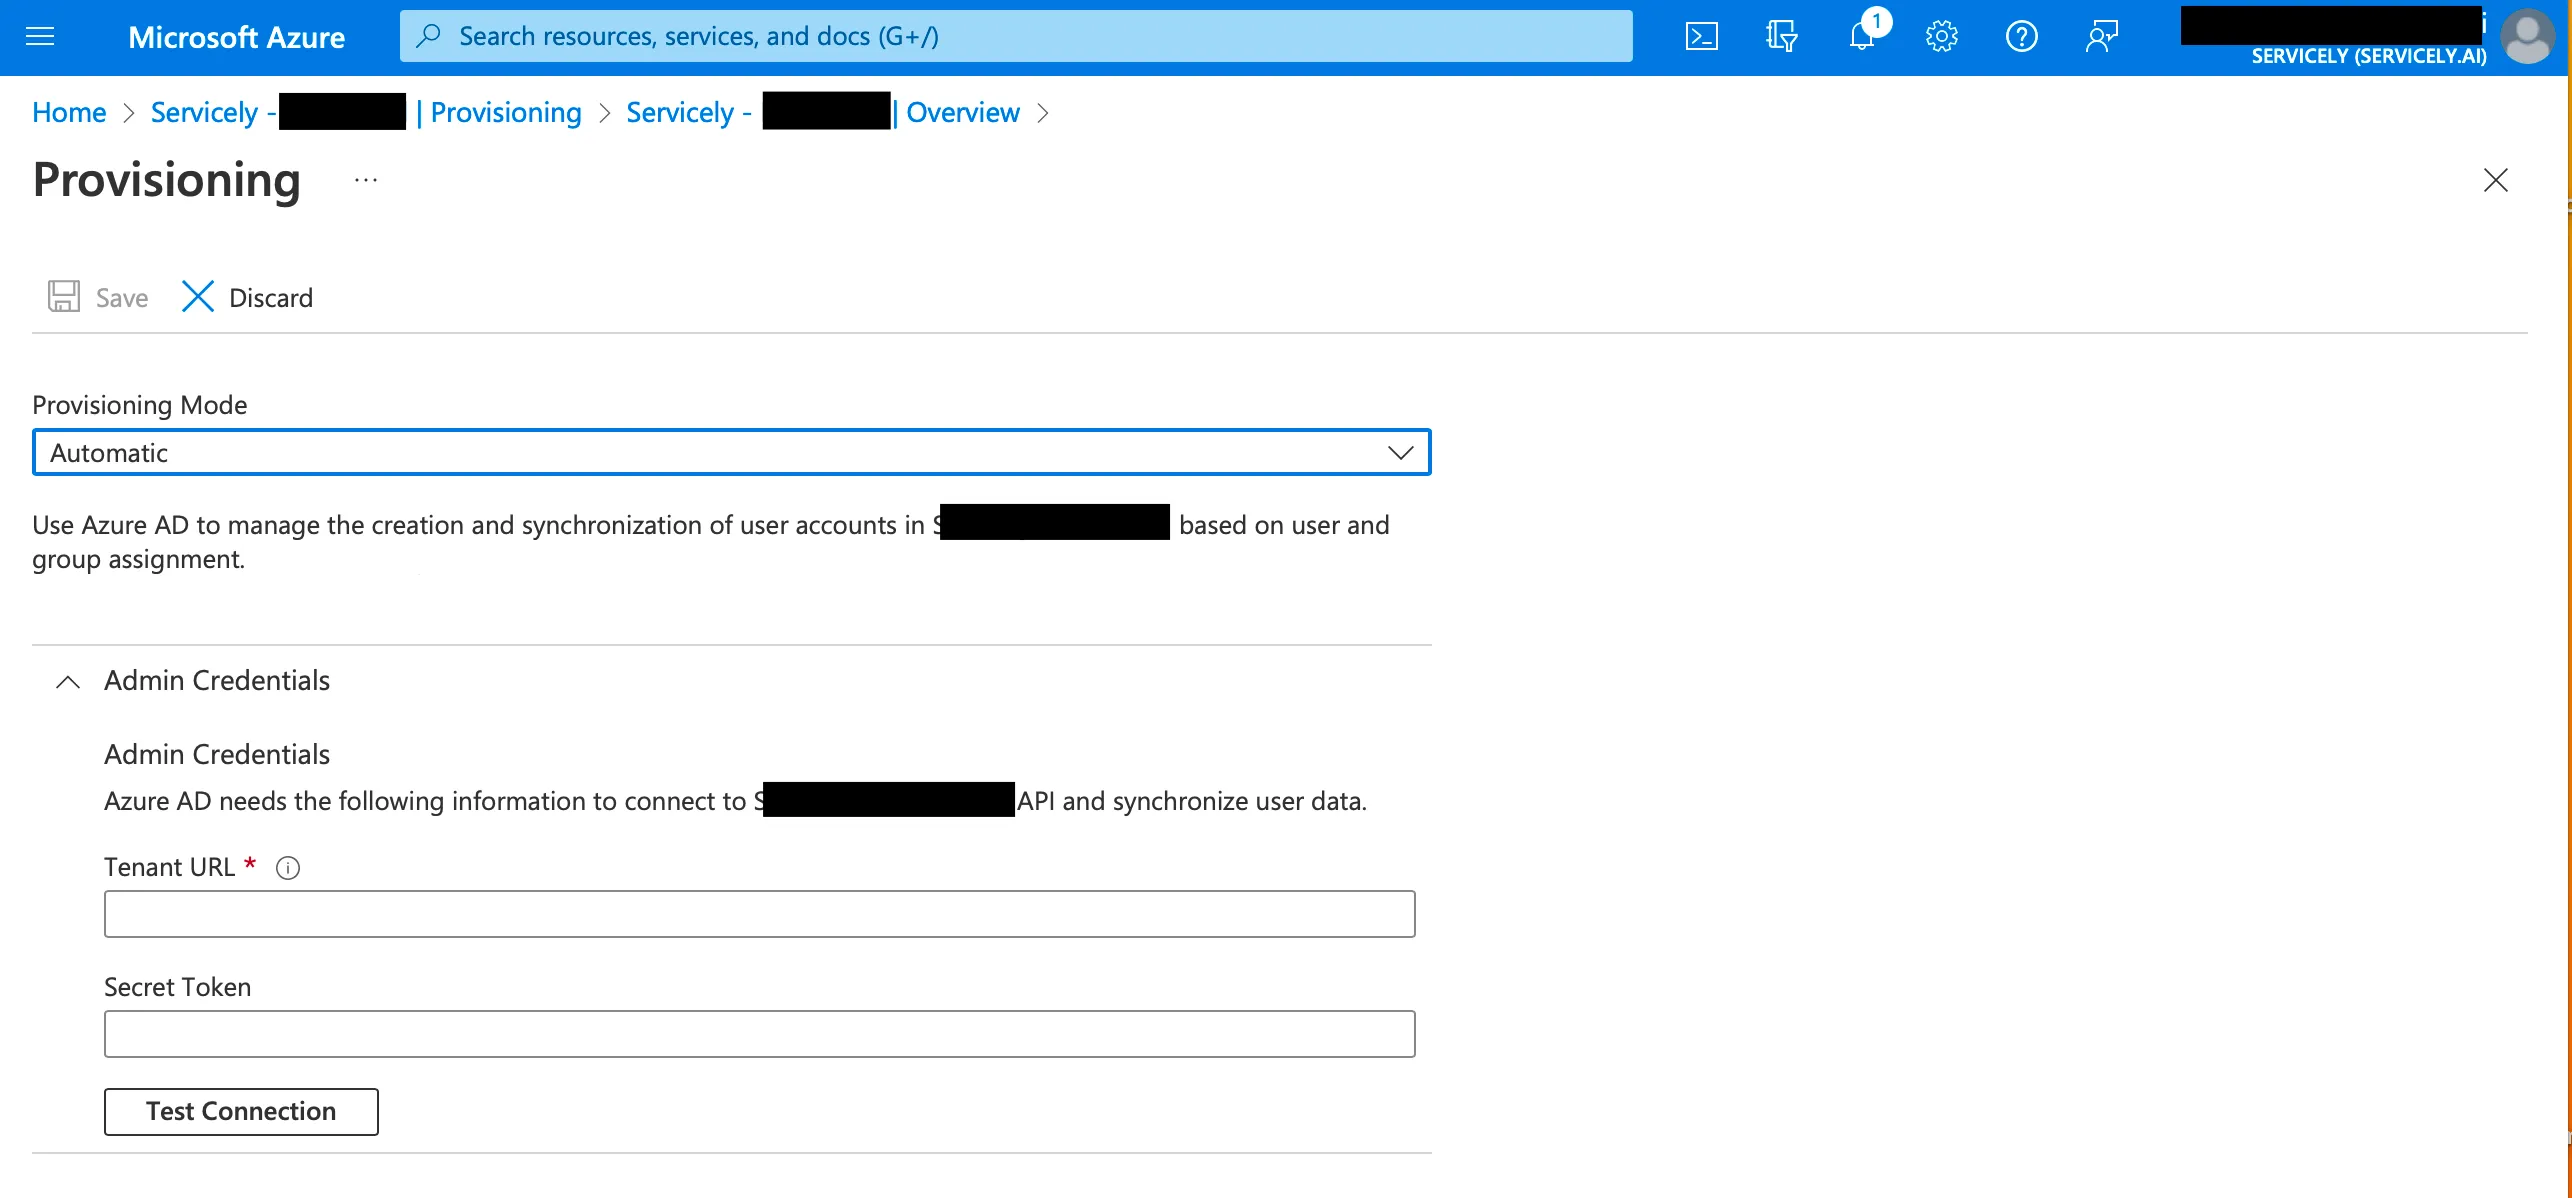
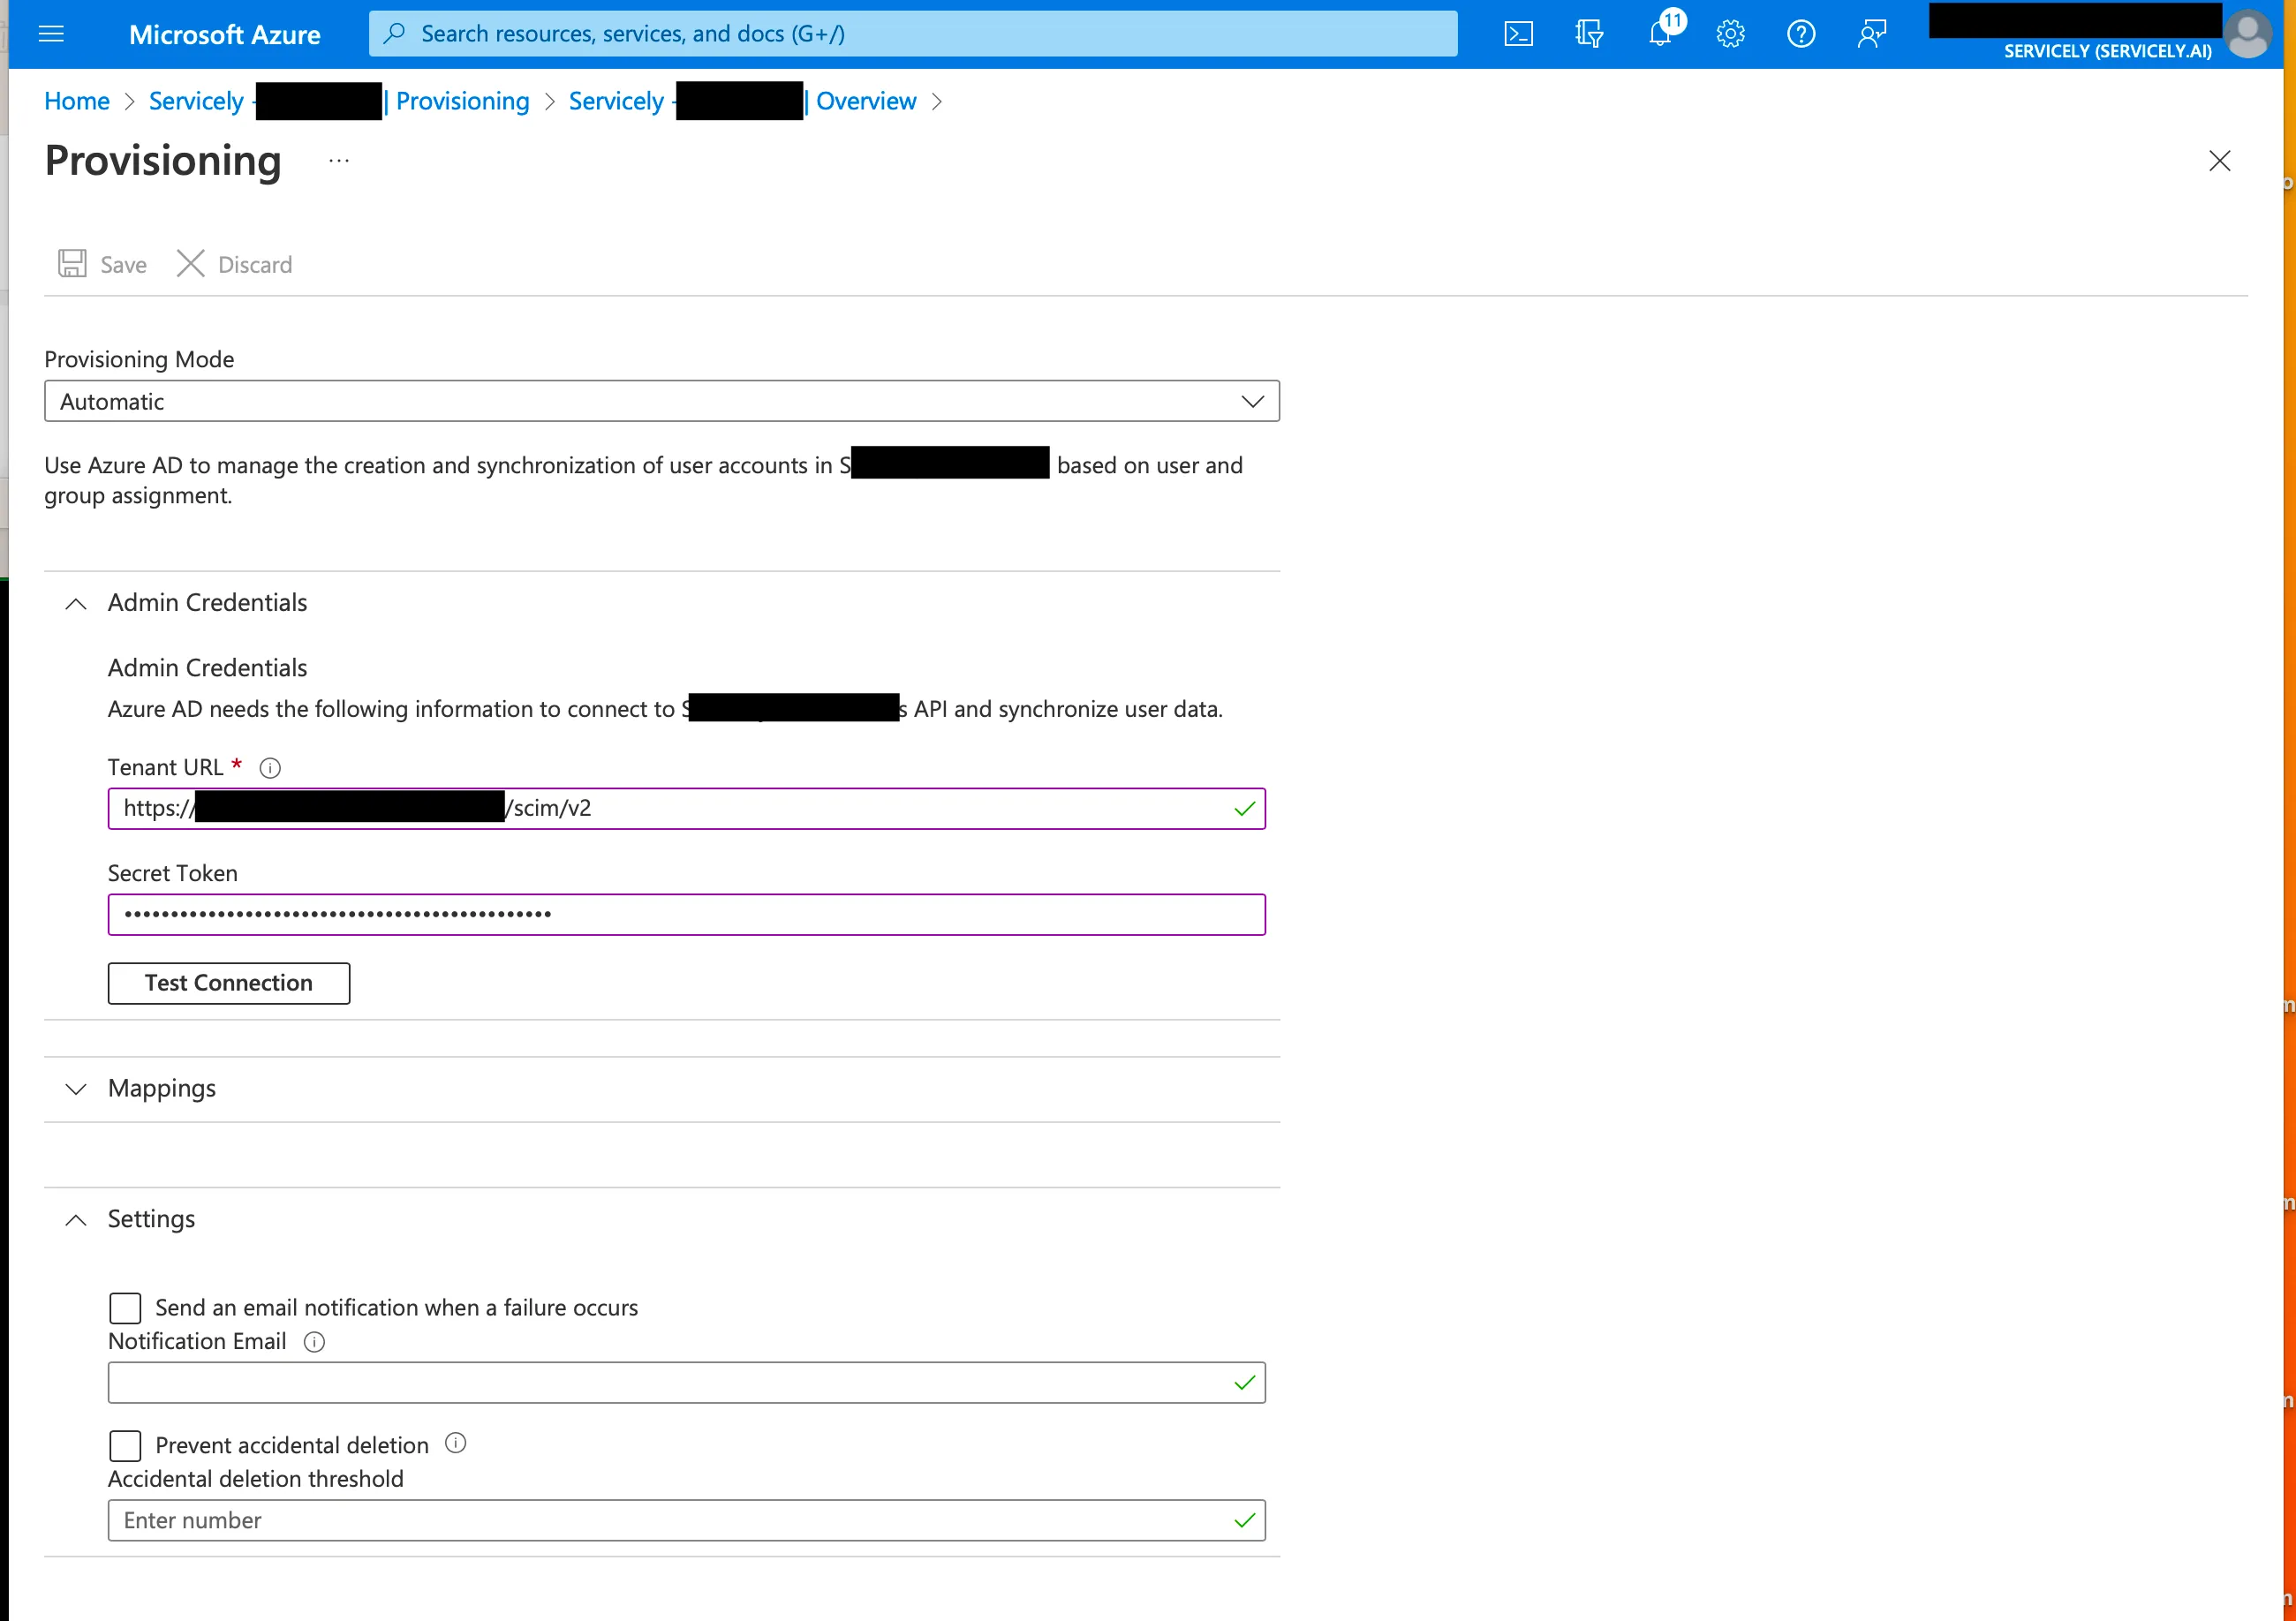
Enter the URL for the SCIM endpoint and the System API Token record’s “Token” (recorded previously) for the Servicely environment that is to be provisioned.
Typical values look like:
Tenant URL | https://<instancename>.servicely.ai/scim/v2?aadOptscim062020 |
|---|---|
Token (Not Shared Secret) | O1p2bRKhLYoX1.jkJljmX1usO5BuWEh4CohXyLVeaw2H7V |
Please note that if you need to support multiple SCIM providers, you will need to have a different Tenant URL for each. For more information, please see "Support for multiple SCIM tenants" section

Click the Test Connection button to see if Entra ID can connect to the Servicely SCIM endpoint successfully.
If there is no error message then the connection test was successful.
Click the Save button the save the configuration in Entra ID.
Attribute mappings for Users and Groups need to be defined. Servicely currently only supports a fixed set of mappings.
Note that the mappings are from the Entra ID schema to the SCIM schema and not to the Servicely schema. Within Servicely we have another set of mappings from SCIM to Servicely tables and fields.
Still on the Provisioning screen, under the Mappings section, click on Provision Azure Active Directory Users to set the mappings for Users. The default unmodified set of mappings looks like this. It is matching Users by userName.
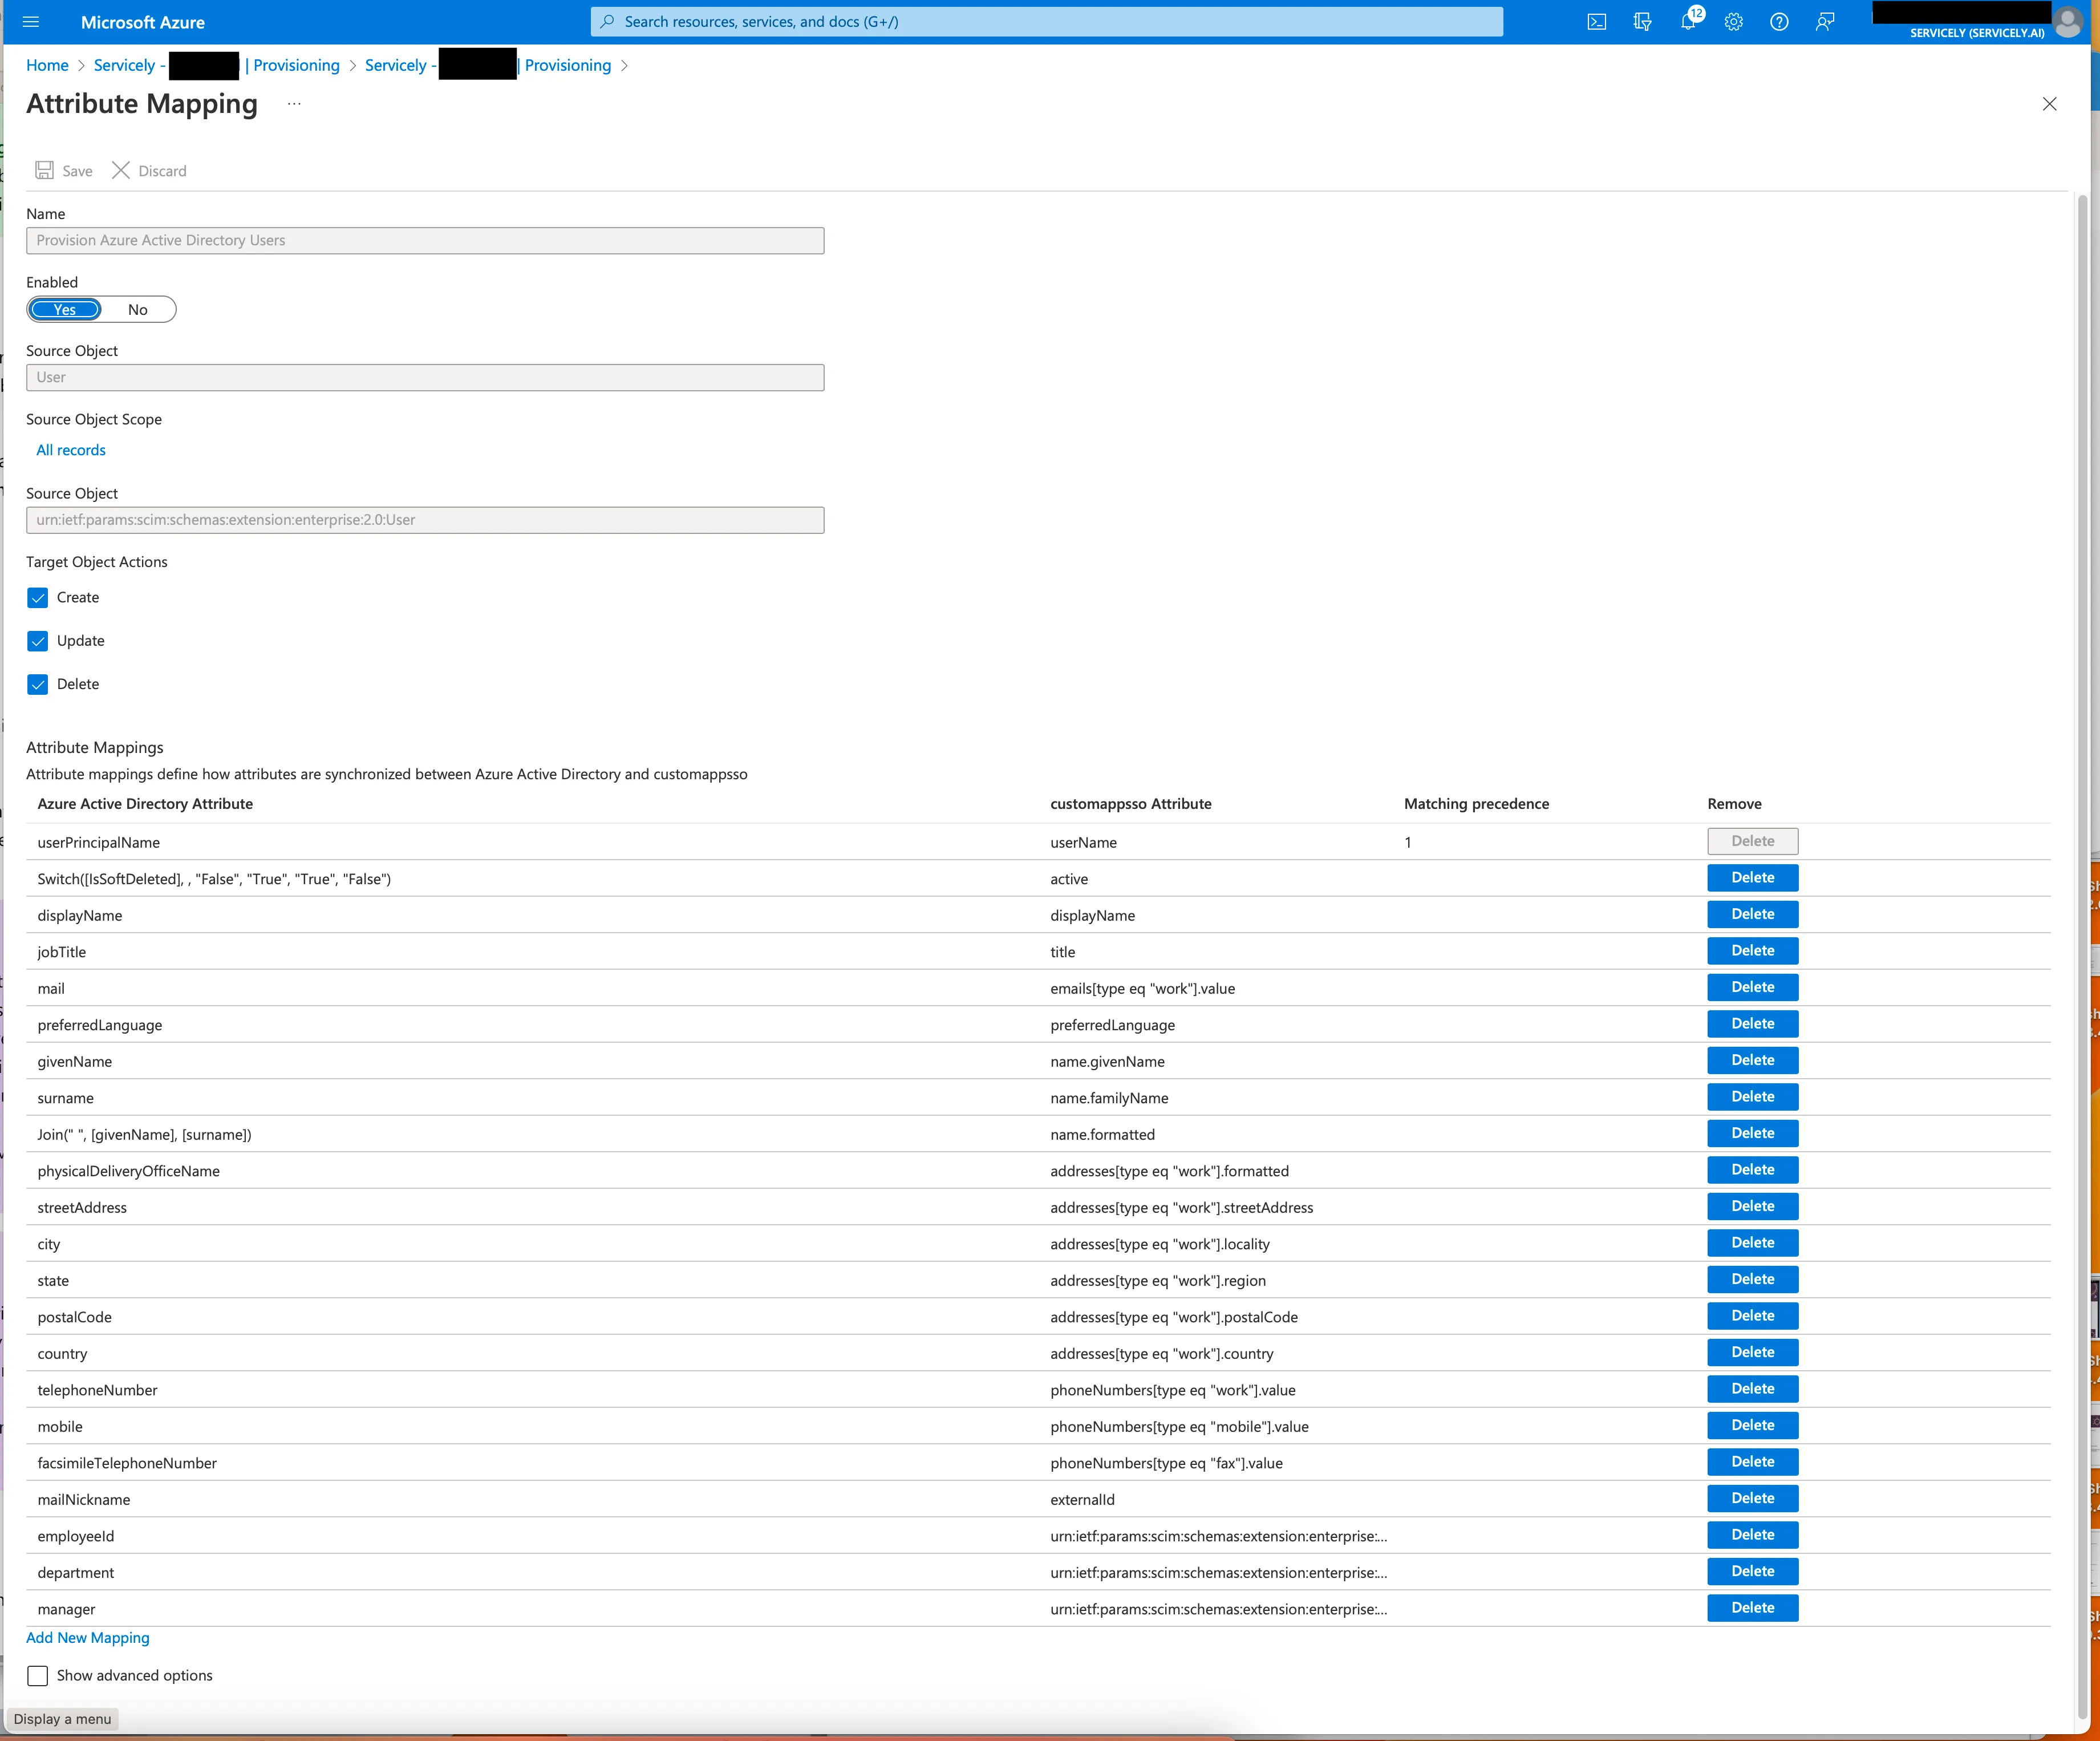
We alter it to be suitable for mapping to Servicely by changing or deleting mappings.
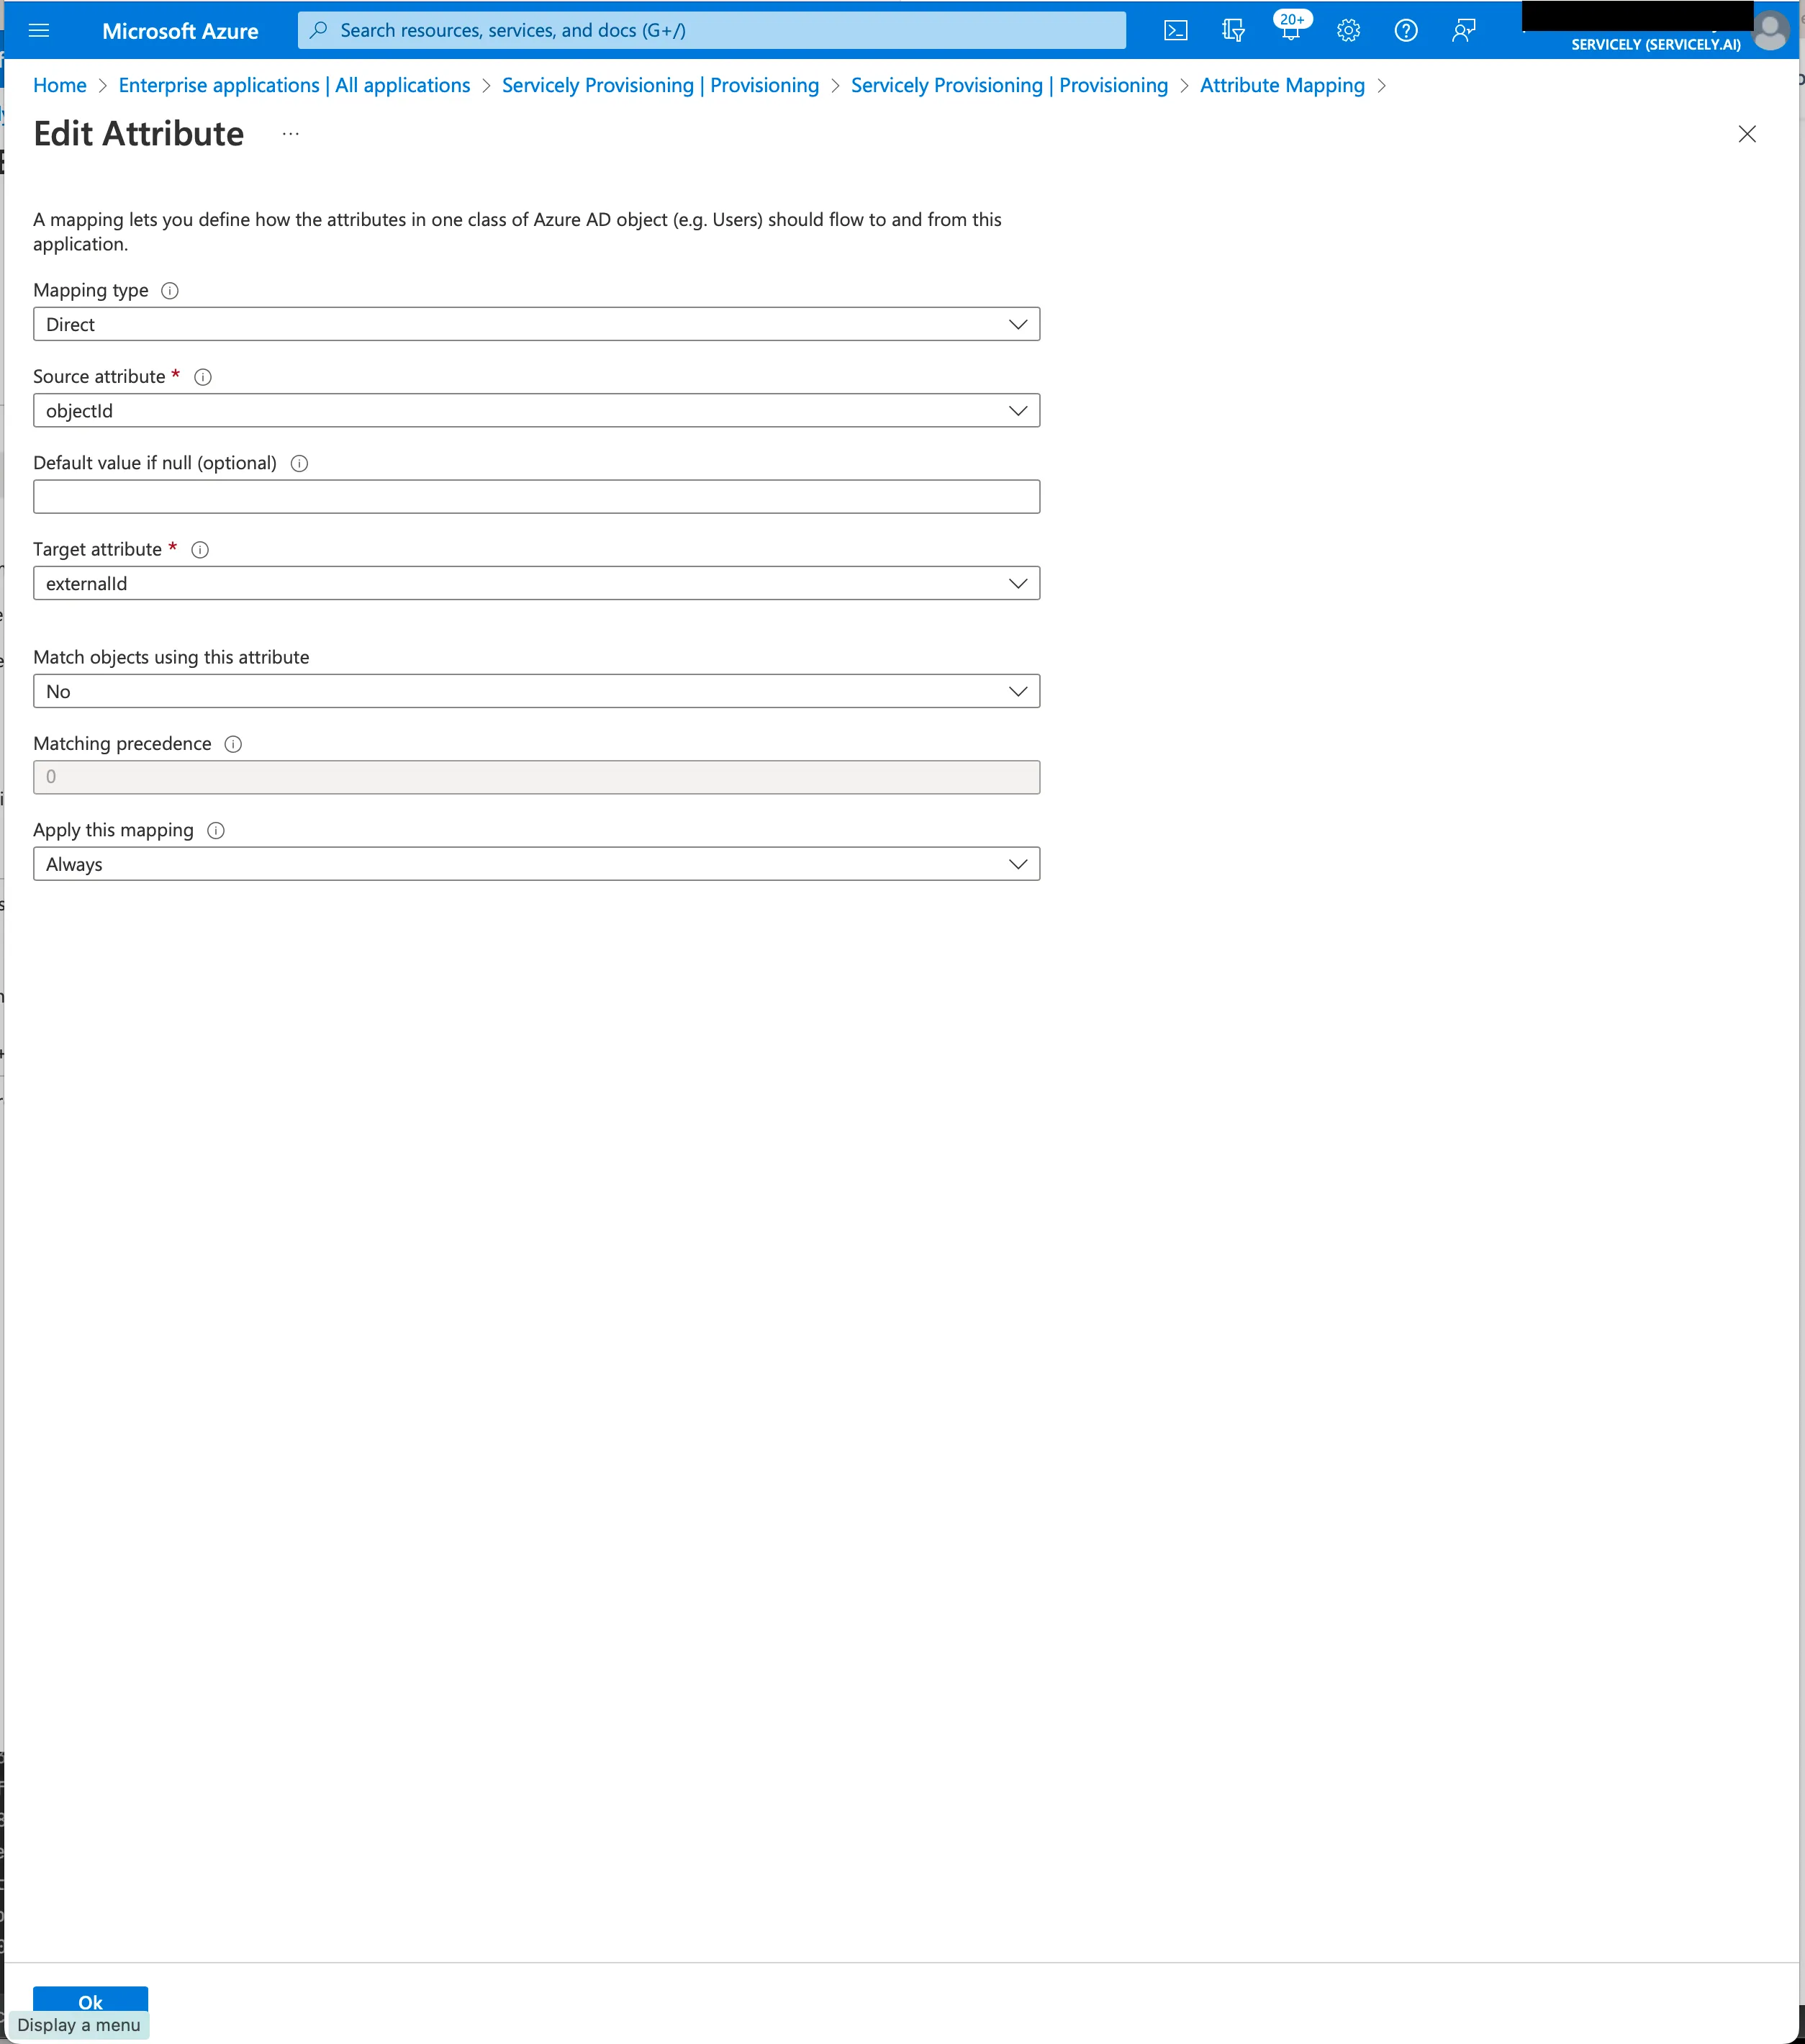
To change a mapping:
- Click on the mapping to bring up the Edit Attribute dialog
- Make required changes
- Click OK
To delete a mapping:
- Click on the Delete button.
Changes
- Change the mapping for externalId from mailNickname to objectId
Deletions
Delete the mappings for:
Servicely is setting user's display field, based on the user's first and last name. There is no need for Entra ID to dictate how Servicely generates display name of users.
- displayName
- name.formatted
You may also want to delete the below mappings if you are not mapping them to Servicely.
There are no equivalent out of box fields in Servicely's User table for the below Entra ID fields. I.e. Location field is a single reference field in Servicely, while there is no field for Fax.
However, if you want to map them, you can create custom SCIM configuration mapping to handle the incoming data. Refer to the "Custom Mappings" section.
- addresses[type eq "work"].formatted
- addresses[type eq "work"].streetAddress
- addresses[type eq "work"].locality
- addresses[type eq "work"].region
- addresses[type eq "work"].postalCode
- addresses[type eq "work"].country
- phoneNumbers[type eq "fax"].value
Other
You might also want to disable the Delete action to ensure that Servicely user accounts are never deleted. In Entra ID you can set the Account enabled property to false which will set the Active property in Servicely to false.
The typical end result looks like this
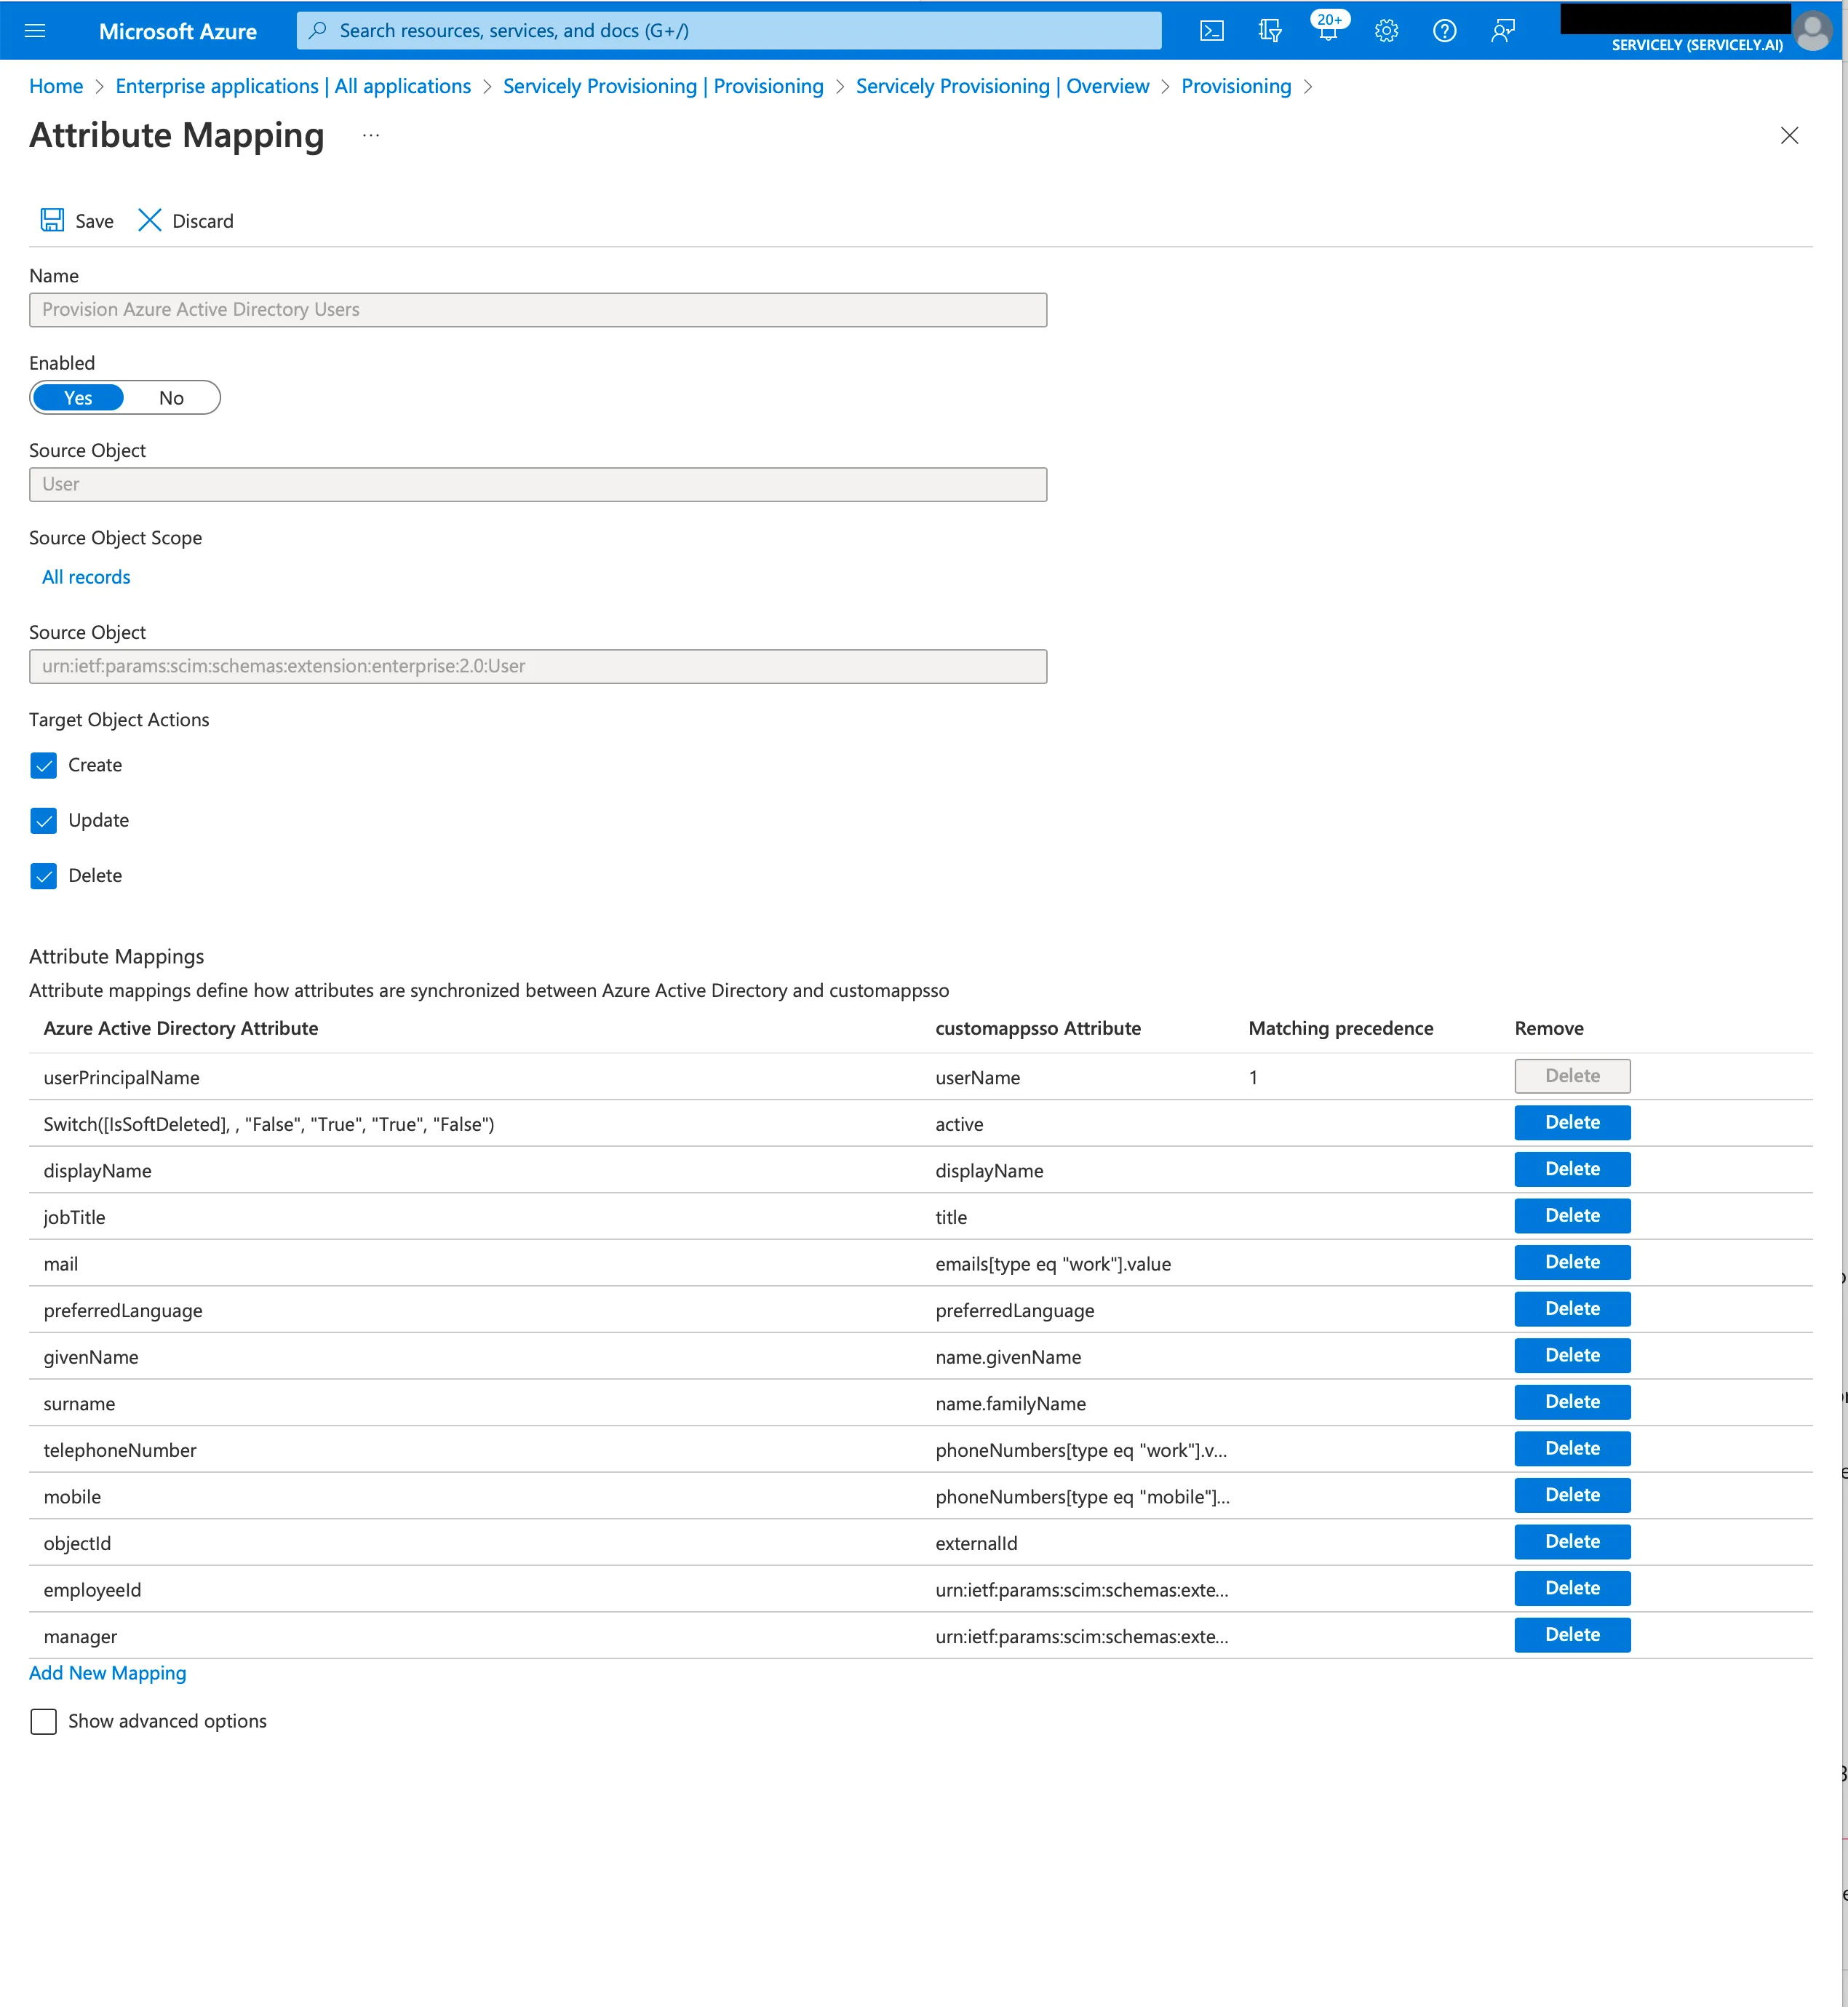
Click on Provision Azure Active Directory Groups to set the mappings for Groups. The default unmodified set of mappings looks like below:
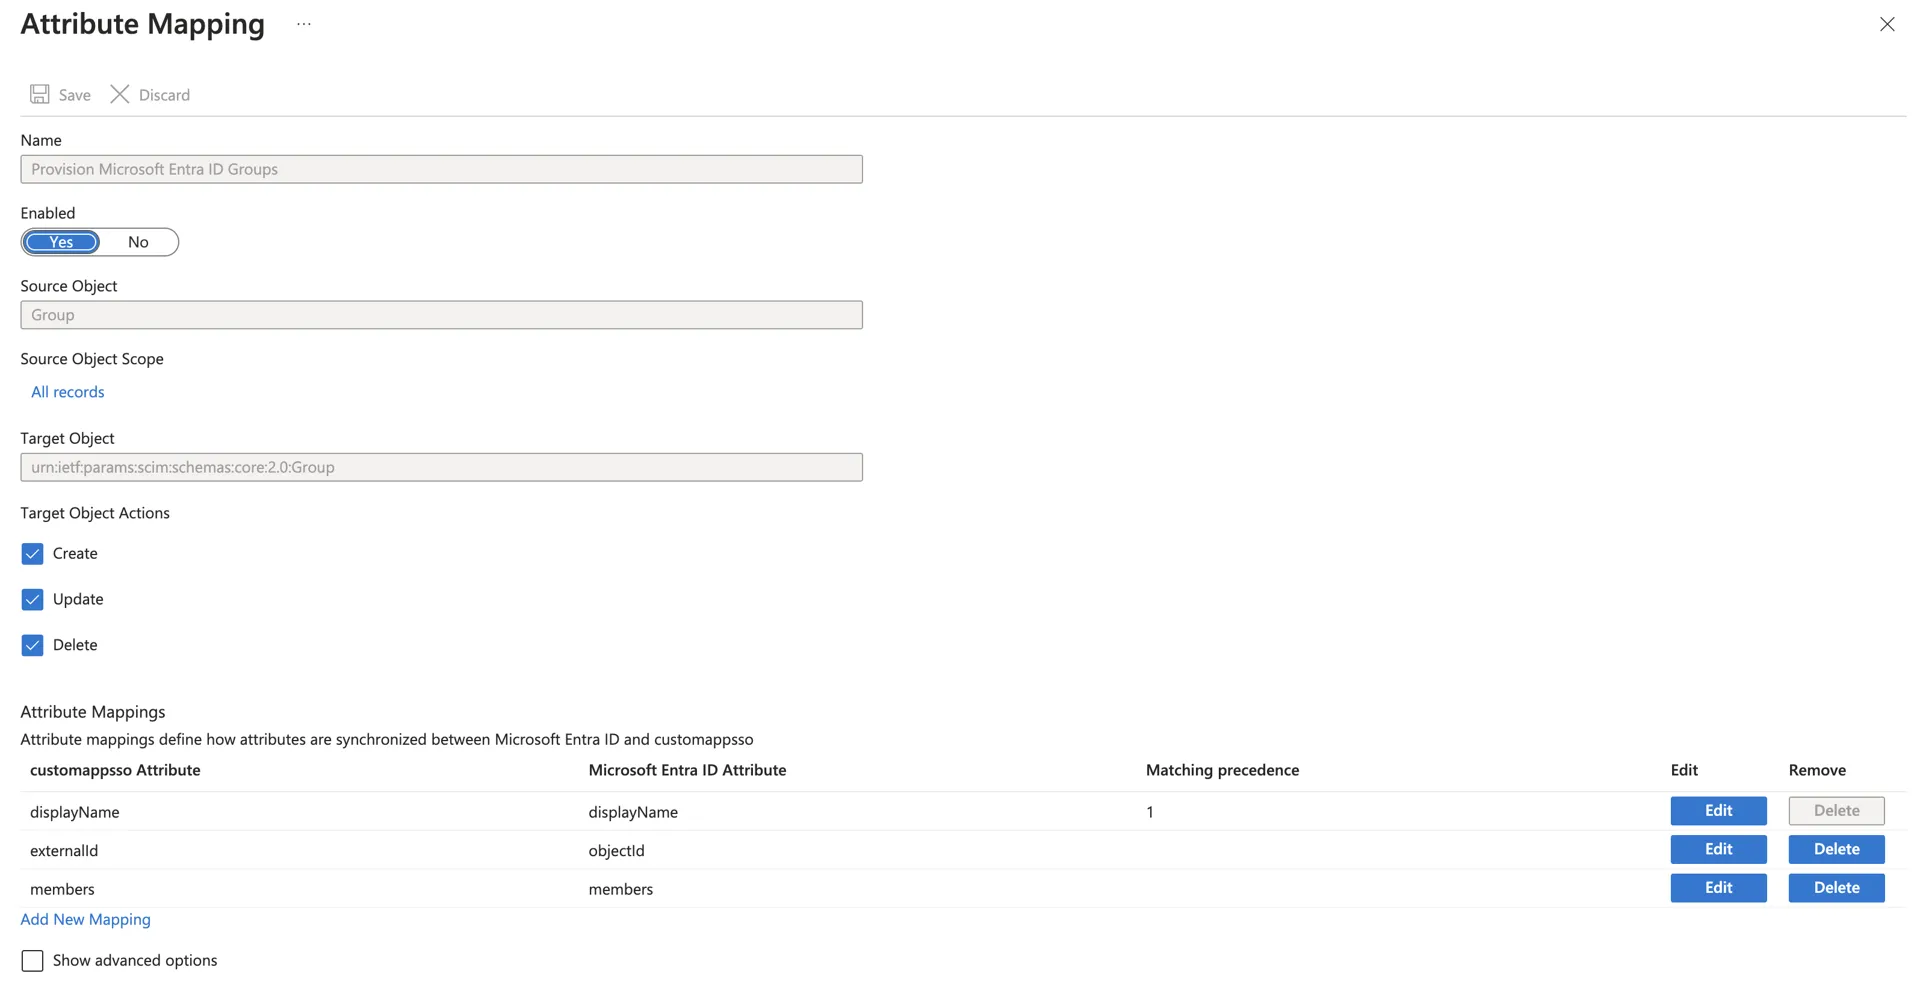
It is matching Groups by displayName. The default mapping for externalId is already objectId.
You might also want to disable the Delete action to ensure that Servicely groups are never deleted.
Before turning on Provisioning it is important to also set the User and Group scope. Click on Overview and then click on Add scoping filters and make sure the Scope is Sync only assigned users and groups.
Accidental deletion prevention and a notification email can also be set at this point.
To test provisioning immediately without having to wait for the provision cycle (40 minutes usually) you can use the provision on demand feature. Click on the Provision on demand link and enter up to five users or a group and some users, then click on the Provision button.
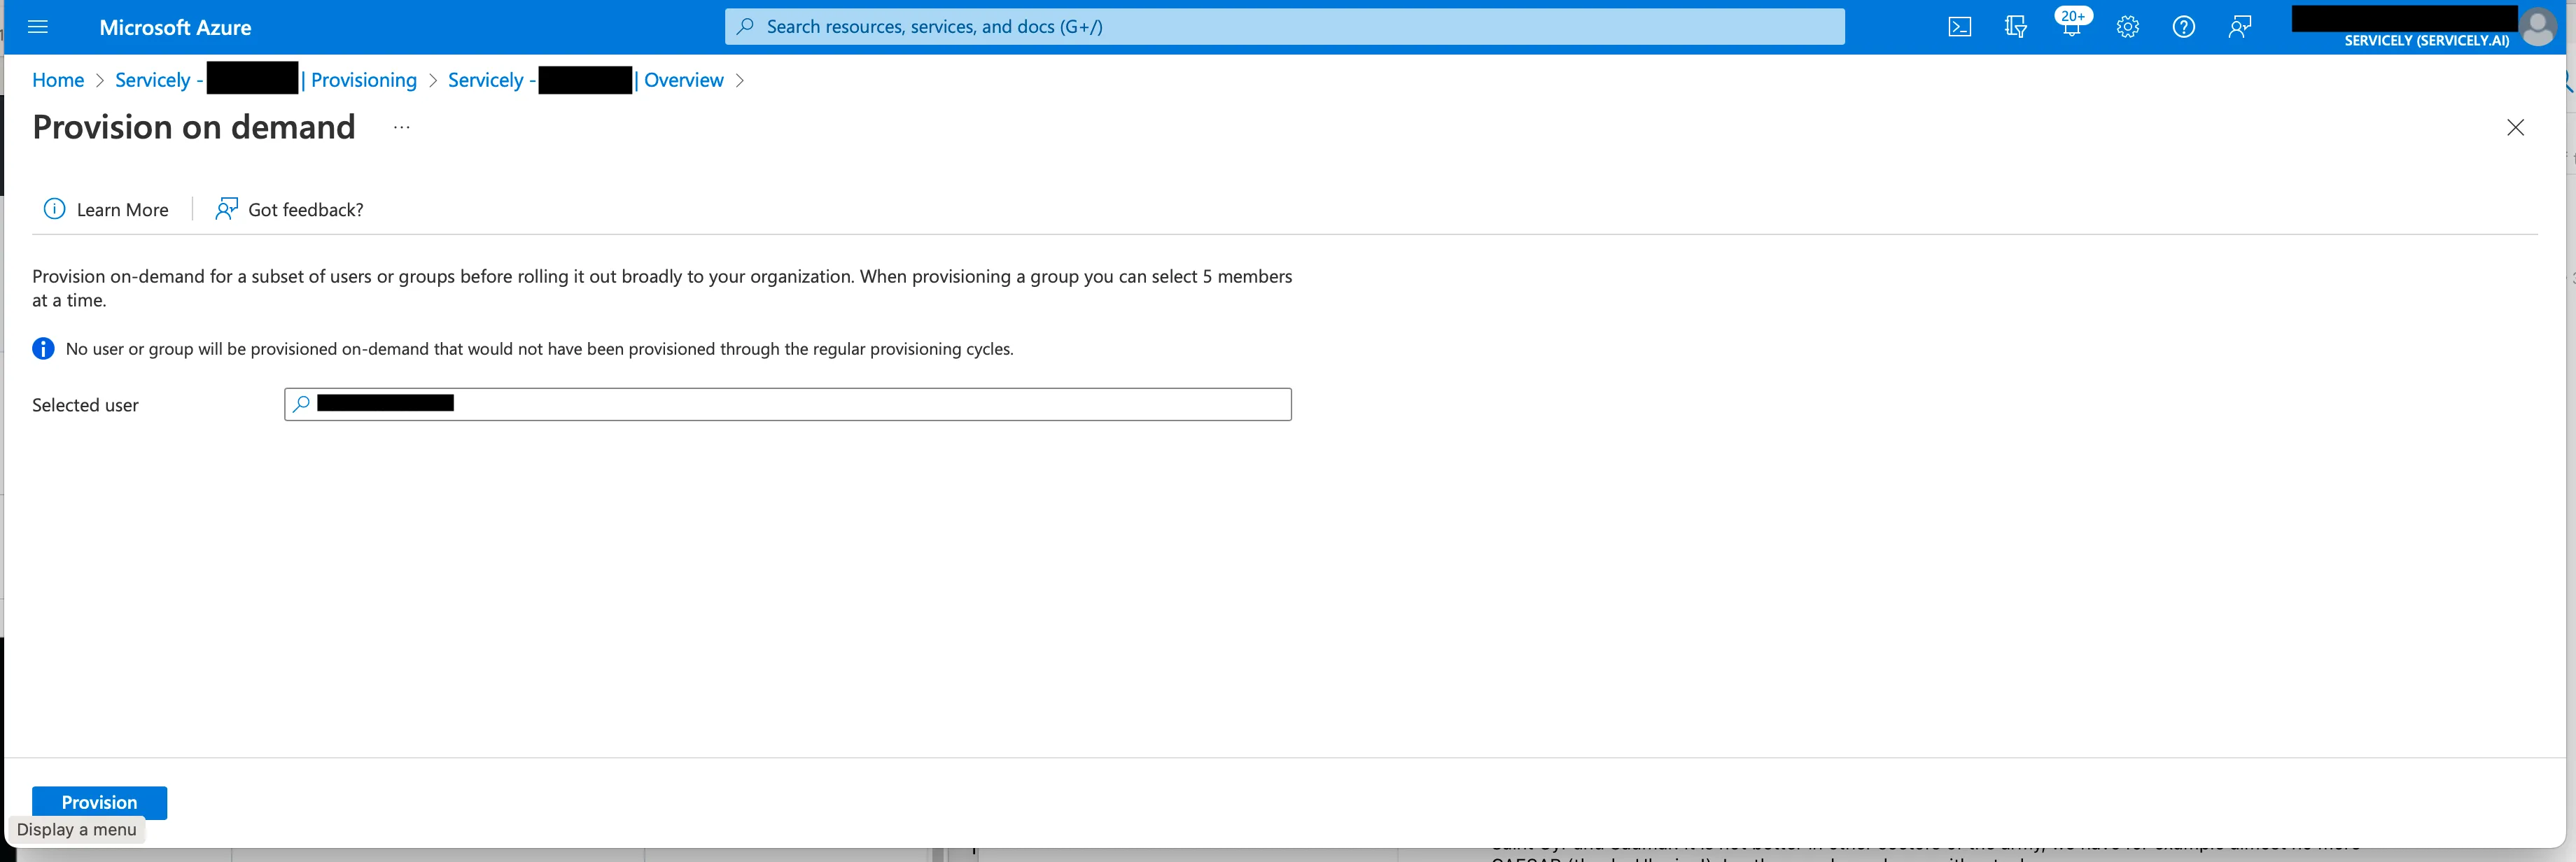
An attempt will be made to provision the named users and groups and the results will be displayed
Assigning users, groups
If you are creating a new Entra ID Enterprise application solely for user provisioning, you will need to assign users and groups into the Enterprise Application. The assigned users and groups will then be synchronised across to Servicely.
Activate provisioning
When ready, change Provisioning Status to On and click Save.

Provisioning will start automatically. Errors can be seen in the Provisioning logs

Configuration in Servicely (Part 2)
Servicely Mappings
Services has a set of default mappings from SCIM attributes to servicely properties and the ability to override these default mappings with custom mappings.
Default mappings
The default mappings provide the minimum required to make Servicely integrate with Azure AD.
SCIM User Attribute | Servicely User Field |
|---|---|
id | ExternalKey |
externalId | ExternalKey |
name.givenName | FirstName |
name.familyName | LastName |
userName | UserName |
title | Title |
preferredLanguage | PreferredLanguage |
timezone | TimeZone |
emails[type == “work”] | |
phoneNumbers[type == “work”] | DeskPhone |
phoneNumbers[type == “mobile”] | Mobile |
enterpriseUser.employeeNumber | EmployeeNumber |
enterpriseUser.manager | Manager |
SCIM Group Attribute | Servicely Group Field |
|---|---|
id | ExternalKey |
externalId | ExternalKey |
displayName | Name |
Custom Mappings
Servicely supports custom mappings that override the default mappings and can also be used for mappings where there is no default mapping.
To add a new mapping click the New button on the Attribute mappings related list of a SCIM Configuration
A mapping consists of a SCIM Schema (User or Group) and a SCIM top-level attribute (such as userName or emails). Note that mappings for attributes that have a complex structure, such as emails, are handled in one mapping. There are two scripts in a mapping: Inbound and Outbound. The Inbound script is used to map from SCIM to Servicely, while the Outbound script is used to map from Servicely to SCIM.
Here is an example mapping for Country, which maps the country part of an SCIM ‘work’ address attribute to a country field on the User record. The Outbound mapping creates a SCIM addresses response of type work that only contains the country subattribute.
Note that the Inbound and Outbound scripts have to be inverses as Entra ID uses the results from Servicely (and hence the result of the outbound script) to know if it should be setting the Servicely field or not:
- The Inbound script is handling when Entra ID pushes data into Servicely (in other words, map from SCIM to Servicely), while,
- The Outbound script is handling when Entra ID is querying Servicely to find out the current Servicely value for a particular mapping for a User/Group record (in other words, map from Servicely to SCIM)
Below is an example mapping for Country, which maps the country part of an SCIM ‘work’ address attribute to a country field on the User record. The Outbound mapping creates a SCIM addresses response of type work that only contains the country subattribute.

Here is an example mapping that uses two fields of the enterpriseUser attribute to set Department and Company on the user record. Departments and Companies are created if they don’t exist:

Inbound script example below:
// department (string) -> urn:ietf:params:scim:schemas:extension:enterprise:2.0:User:department [lookup by Department.Name] -> User.Department
// companyName (string) -> urn:ietf:params:scim:schemas:extension:enterprise:2.0:User:organization [lookup by Company.Name] -> User.Company

// attributeData will be something like:
//
// {
//     "employeeNumber" : "5554433",
//     "organization" : "Foo",
//     "department" : "Bar",
//     "manager" : {
//       "value" : "4028818a3a2f75cc013a311ffad60000",
//       "displayName" : "Chris Jones",
//       "$ref" : "http://localhost:8080/#/User/4028818a3a2f75cc013a311ffad60000"
//     }
//   }
//
// We need to find the department and companyName attributes and look up and set on the user record.
// Create new ones if they are missing.

if (attributeData) {
    let departmentName = attributeData.department;
    let companyName = attributeData.organization;

    if (departmentName) {
        let department = Table("Department", EQUAL("Name", departmentName));
        if (!department) {
            department = Table("Department").newRecord().Name(departmentName).create();
        }
        current.Department(department.ID());
    }

    if (companyName) {
        let company = Table("Company", EQUAL("Name", companyName));
        if (!company) {
            company = Table("Company").newRecord().Name(companyName).create();
        }
        current.Company(company.ID());
    }
}
Outbound script example below:
// User.Department.Name -> urn:ietf:params:scim:schemas:extension:enterprise:2.0:User:department -> department
// User.Company.Name -> urn:ietf:params:scim:schemas:extension:enterprise:2.0:User:organization -> companyName

// Attribute data might be null, if so we need to send at least
//
// {
//     "organization" : "Foo",
//     "department" : "Bar"
// }

let departmentName = null;
let companyName = null;

let department = current.Department();
if (department) {
    departmentName = department.Name();
}

let company = current.Company();
if (company) {
    companyName = company.Name();
}

if (departmentName || companyName) {

    attributeData = attributeData || {};

    if (departmentName) {
        attributeData.department = departmentName;
    }
    if (companyName) {
        attributeData.organization = companyName;
    }
}

answer = attributeData;
Support for custom attribute
You can add another attribute or more, to the Entra ID User/Group provisioning's mapping as long as you are mapping to the available "customappsso " attributes.
Example - Group email mapping
Entra ID configuration
- Go to Group mapping screen, click on the Show advanced options checkbox and then click on the Edit attribute list for customappsso link.
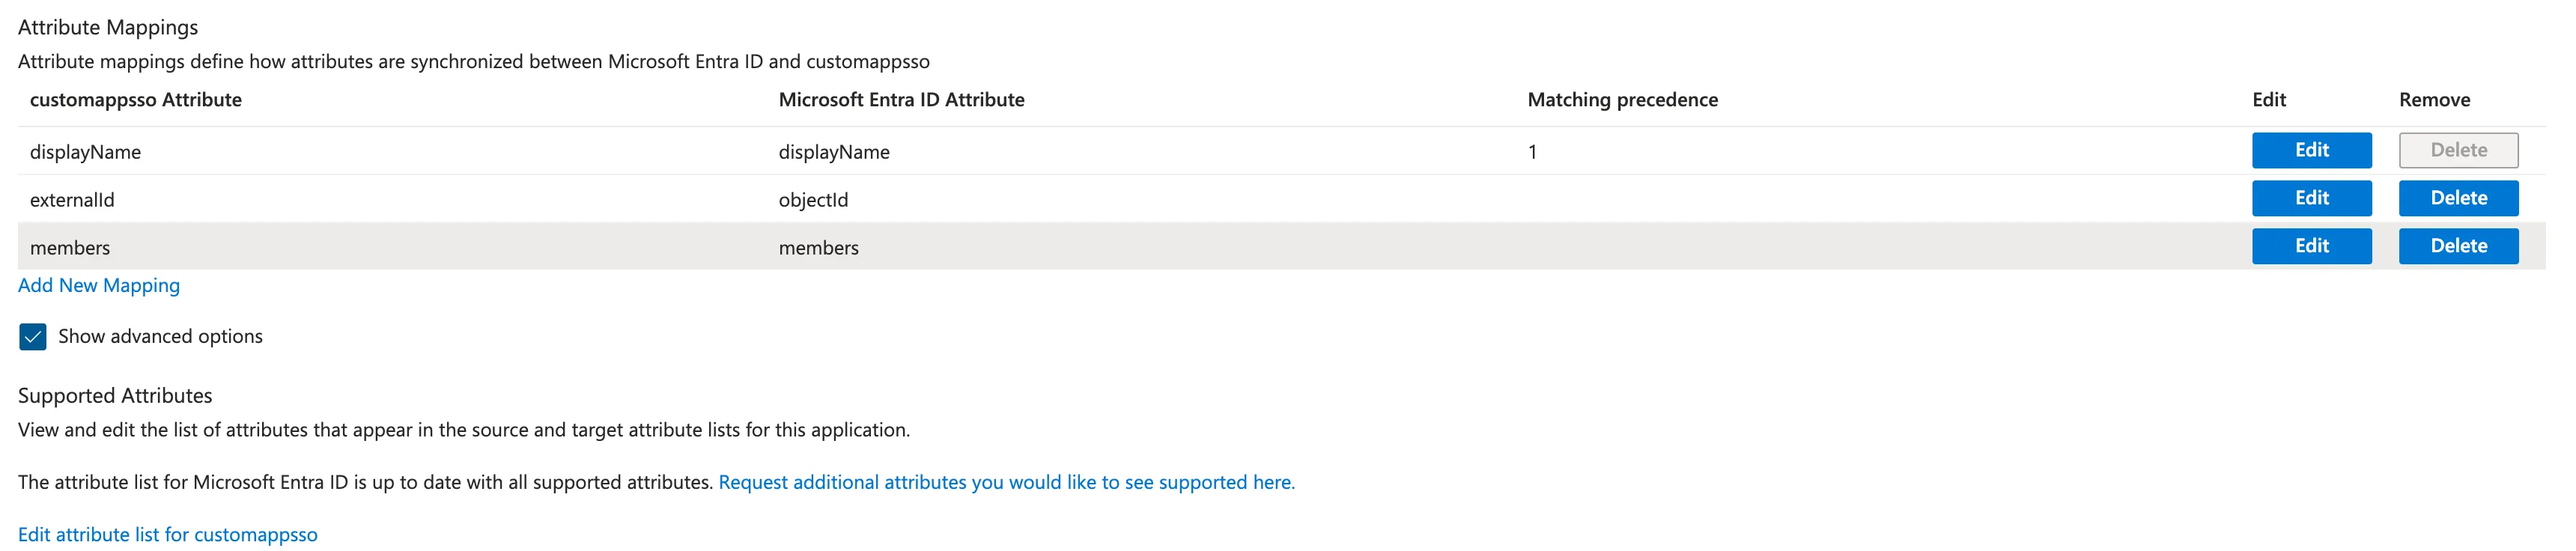
2. On the edit attribute page, add new attribute named urn:ietf:params:scim:schemas:extension:Servicely:2.0:Group:extensionAttribute1 and click “Save”

3. Then, back on the Group mapping screen, edit the mapping by clicking on “Edit”
4. On the “Edit Attribute” screen, set the “Source attribute” to be mail

5. Then, the list of Group mappings should look like the below:

Servicely configuration
Go to the active SCIM configuration record for your Entra ID to Servicely data synch and add a new related SCIM attribute mapping record. The mapping should look like the below:
Servicely field | Value |
|---|---|
Name | Group email mapping |
Active | Yes |
Schema | Group |
Attribute | urn:ietf:params:scim:schemas:extension:Servicely:2.0:Group |
Inbound script | Servicely does not have an out of box field for Email for Group records, so, the below assumes you create a custom field called C_Email. As needed, replace C_Email with your custom field’s name. if (attributeData?.extensionAttribute1) {
current.C_Email(attributeData.extensionAttribute1);
} |
Outbound script | Servicely does not have an out of box field for Email for Group records, so, the below assumes you create a custom field called C_Email. As needed, replace C_Email with your custom field’s name. let email = current.C_Email();
if (email) {
attributeData = attributeData || {};
attributeData.extensionAttribute1 = email;
}
answer = attributeData; |

Support for multiple SCIM tenants
If you need your Servicely environment to support multiple SCIM tenants (or pushing User/Group data from multiple Entra ID tenants), you will need a Servicely SCIM configuration record for each tenant.
For each SCIM configuration, you need to set the “Key” field in Servicely. This will result in the SCIM configuration record making a unique URL available for each SCIM tenant to push User/Group data into, independent of each other.

For each Servicely SCIM configuration record, you will still need to configure the relevant related attribute mappings.
When configuring Entra ID application for the SCIM synch, per tenant, below are the tenant URL formats to apply in the connectivity part:
Tenant URL without Key configured: https://<instancename>.servicely.ai/scim/<ServicelyKey>/v2?aadOptscim062020
Tenant URL with Key configured: https://<instancename>.servicely.ai/scim/<Key name>/v2?aadOptscim062020
Example is https://<instancename>.servicely.ai/scim/secondarySCIMProvider/v2?aadOptscim062020: